35 minutes
Smart App Control Internals (Part 2)
Welcome back to SAC Internals! In the previous post we saw how SAC gets enabled and initialized. In the current post we will discuss how SAC enforce the actions. This is a good moment to clarify something that might not have been completely clear in the first part. Even thou SAC is a new feature, most of the code used by the feature to work was already in place on the OS. By this I mean, that one can get a similar behavior in versions before 22H2 by using the proper policy rules. So to summarize, the biggest change with regard to SAC is that MS will activate a specific WDAC policy, similar to how the OS enables the Driver Block Rules policy when you enable HVCI.
I wanted to clarify that because a lot of what we are going to see in this post has been in the OS for a long time. It has been leveraged by features like AppLocker or AppID. Of course, there’s a few aspects that will only apply to SAC and I’ll make sure to remark those. On the bright side, the vast majority of this post can be extrapolated to how other WDAC policies are evaluated.
Without further ado, let’s get into the post. We will start with a very high-level diagram of how an object gets validated by the CI.

SAC in Action
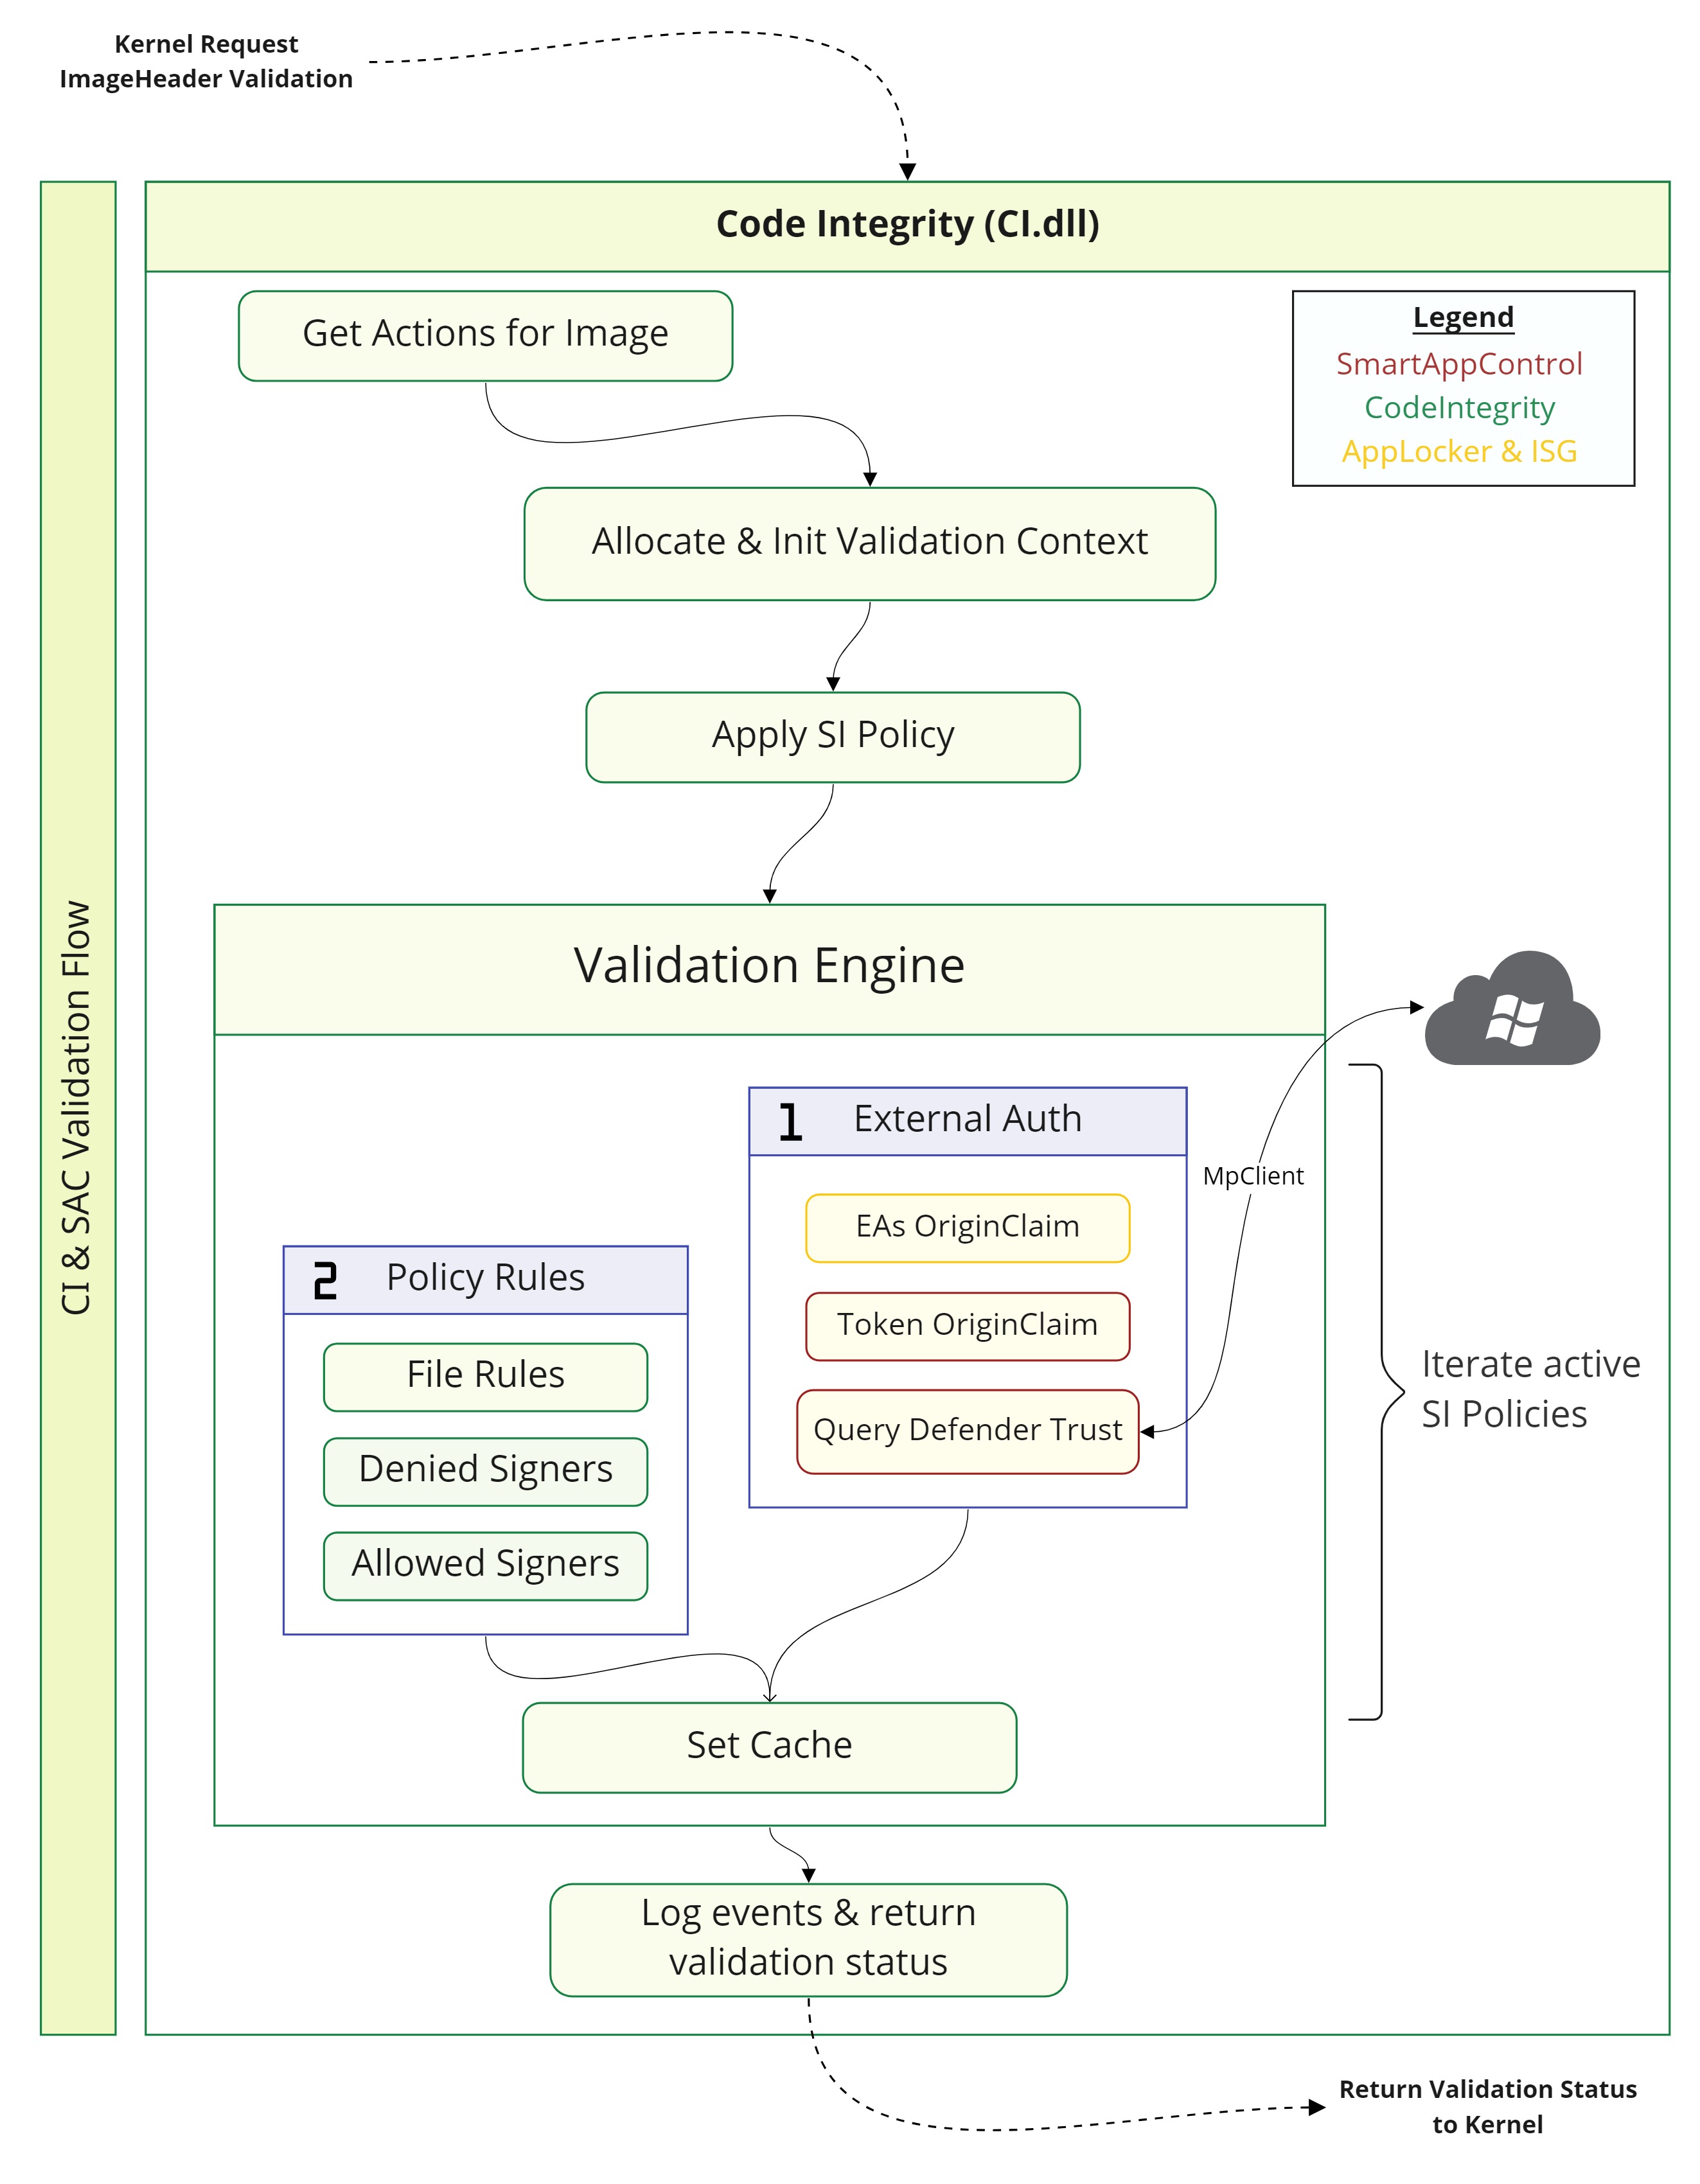
In this section we will focus our attention into the steps taken by the CI to handle a validation request coming from the kernel. We will dig deeper into the main routines involved in this process and we will also discuss some of the main structures used by the CI. As I just mentioned, most of this steps are not exclusive of SAC and they will be taken no matter which policies are enabled. Looking at the previous diagram, we see there’re three main sources of evaluation. As far as I can tell, these points are related with the following Features/Policy Rules – The choice of using one or many of the evaluations depends in the Policy Rules.
- OriginClaim (EAs or Token): Managed Installer, AppLocker, SmartScreen & SAC
- Query Defender: Intelligent Security Graph (ISG) & SAC
- Policy FileRules: Generic to all Policies with FileRules
The following diagram shows in better detail the steps taken by the CI to validate an image:
So to start our journey, we already know from the first post that the global g_CiPolicyState has the bit NW_ENABLED meaning SAC is enabled and the SAC policy (Enforce or Evaluation) is active and stored in the g_SiPolicyCtx. Now let’s take a look at the callbacks provided by CI to the kernel to find what ways the kernel has to validate and object. The following functions suggest the option of executing some type of Validation:
- CiValidateImageHeader
- CiValidateImageData
- CiValidateFileAsImageType
- CiRevalidateImage
In this post I’m only going to focus on CiValidateImageHeader
CiValidateImageHeader
This function is, arguably, the main entrypoint for most of the CI validations. The Kernel will call this function from SeValidateImageHeader which is referenced within MiValidateSectionCreate. CiValidateImageHeader will handle the Phase 2 of the CI initialization – Mainly initialize minCrypt, ETW, Lookaside buffers, etc… – Once this is done (Only once), the first step is to obtain the Actions for the specified image (CiGetActionsForImage). This function will determine the actions that will take place for the validation based on things like the Requested SigningLevel or if the object comes from a Protected or System Process – I have to be honest here, the actions are a bitfield enum but I have no clue what most of the values mean 😄.
Once the actions have been obtained, the function is ready to start validating the image. In case the action variable has bit 0 set (ACTION_FILE_IN_CACHE (0x1)) then the CI will try to obtain any previously validation data already set for this FO, and re-validate it.
We won’t touch on the CI cache and how it’s validation works in this post. In essence it will try to obtain the Kernel EAs:
$Kernel.Purge.CIpCacheor$Kernel.Purge.ESBCache(See functionCipGetFileCache). Then it will apply the policy to these attributes insideCiApplyPolicyToSyntheticEa. This routine will end up callingCipApplySiPolicyExwhich we will discuss in detail later.
If the “file in cache” attribute is not set, then the main structure to process validations will be allocated (CipAllocateValidationContext). This structure is used for all types of validation, as an example this same context is also used for HVCI validation (See CiHvciSetValidationContextForHvci). Once this context is allocated, there’s two actions I’ve seen taking place for UMCI validation.
- If bit 2 is set (
ACTION_PAGE_HASH (0x4)). Validation function ->CipValidatePageHash - If bit 8 is set (
ACTION_FILE_HASH (0x100)). Validation function ->CipValidateFileHash
CipValidateImageHash will receive as a function pointer the Validation function for the action taking place. No matter what function pointer is passed, PageHash or FileHash, CipValidateImageHash will end up calling it. In both Validation functions, the CI will update the validation context with information from the object being validated. Things like the FileInfo (CipUpdateValidationContextWithFileInfo), the File Version (CiGetFileResourceInformation), the Embedded Signature (CipImageGetCertInfo) or the object hash (Page CipCalculateHeaderHash or File CipCalculateImageHash). With all this information the code will proceed to apply the policy by means of the function CipApplySiPolicyEx.
For validation of unsigned images the Validation Function will return
STATUS_INVALID_IMAGE_HASHand the code will proceed intoCipApplySIPolicyUMCIwhich end up calling the aforementionedCipApplySiPolicyEx. In the contrary for signed files, this function will be reached fromCiVerifyPageHashSignedFileorCiVerifyFileHashSignedFile(As a quick note, these two functions have their HVCI counterpartCiHvciXxx).
CipApplySiPolicyEx
As the name implies, this function will apply the policy to the Object being validated. The function will first set up two structures that will be passed afterwards to the validation engine. One structure will hold the information of the ImageFile being validated while the other one will contain the information needed for the “external” authorization process – I say “external” authorization because MS uses that word in the function name of the callback that will validate the Object.
These two structures will be stored inside the Validation Context and both will actually be filled with data from it. The one that contains the Image data, I named CI_VALIDATE_IMAGE_DATA, and among other things contains the following:
typedef struct _SI_CERT_CHAIN {
  UINT32 AlgId;
  INT32 Size;
  PVOID Hash;
  UNICODE_STRING IssuedTo;
  UNICODE_STRING IssuedBy;
} SI_CERT_CHAIN, *PSI_CERT_CHAIN;

typedef struct _SI_EKU {
  INT32 Type;
  PVOID Oid;
} SI_EKU, PSI_EKU;

typedef struct _SI_CHAIN_INFO {
  INT32 Size;
  PSI_EKU Ekus[];
  INT32 EkusCount;
  PSI_CERT_CHAIN CertChain[];
  INT32 CertChainCount;
  INT32 Type;
  UNICODE_STRING field_28;
} SI_CHAIN_INFO, *PSI_CHAIN_INFO;


typedef struct _CI_VALIDATE_IMAGE_DATA {
  PSI_CHAIN_INFO ChainInfo; // In case the image is signed, parsed in function SIPolicyConvertChainInfo
  PVOID ValidationHash;     // I believe this can take different values depending
                            // what type of validation is being done (PageHash, FileHash, etc..)
  INT32 ValidationHashSize;
  PUNICODE_STRING OriginalFileName;
  PUNICODE_STRING InternalName;
  PUNICODE_STRING FileDescription;
  PUNICODE_STRING ProductName;
  UINT64 ProductVersion;
...
} CI_VALIDATE_IMAGE_DATA, *PCI_VALIDATE_IMAGE_DATA;
On the other hand, the external authorization structure, which I named CI_EXTERNAL_AUTH, has the following interesting values
typedef struct _CI_EXTERNAL_AUTH {
  INT32 SiSigningScenario; // Refer to "Threat Detection using WDAC (Device Guard)" by Matt Graeber to learn more about this field
  ...
  bool RunFullTrustFlag
  bool IsSignedScript
  CI_VALIDATION_CTX **pValidationCtx;
  NTSTATUS (__fastcall *pCipExternalAuthorizationCallback)(SI_POLICY *Policy, CI_VALIDATION_CTX **);
  ...
} CI_EXTERNAL_AUTH, *PCI_EXTERNAL_AUTH;
Before calling the Validation engine routine, CipApplySiPolicyEx will set up an array of structures that contain the validation result per policy, the size of the array will be equal to the number of active policies. I coined this structure as CI_VALIDATION_RESULT and it has the following fields:
typedef struct _CI_VALIDATION_RESULT {
  SI_POLICY_CTX *PolicyCtx;
  bool ReprieveResult;
  bool FileRuleMatchFound;
  INT32 ValidateImageStatus;
  NTSTATUS AuthorizationCbStatus;
  VALIDATE_SCORE ValidateImageScore;
} CI_VALIDATION_RESULT, *PCI_VALIDATION_RESULT;
Finally, we are ready to call SIPolicyObjectValidationEngine, which has the following prototype:
void
SIPolicyObjectValidationEngine(
  PCI_EXTERNAL_AUTH ExternalAuthData,
  PCI_VALIDATE_IMAGE_DATA ValidateImageData,
  PSI_POLICY_CTX PolicyCtx,
  PCI_VALIDATION_RESULT ResultPerPolicy
  );
This routine will simply iterate through the policies (And supplemental policies), calling the internal routine SIPolicyValidateImageInternal for each.
The internal validation routine has the task of calling into the external authorization callback to obtain the Validation score from the “external source”. Based on this score it will proceed, or not, to evaluate the image against the Rules within the policy. We will first focus on the external callback – Set to the function CipExternalAuthorizationCallback – and later we will discuss how the rules of the policy are evaluated.
From what I can see in the code this is a bit different to what MS states in section File rule precedence order . Where they say “It will first process all explicit deny rules it finds. Then, it will process all explicit allow rules. If no deny or allow rule exists, WDAC will check for Managed Installer EA. Lastly, if none of these sets exist, WDAC will fall back on ISG”. Contrary, in the code it seems Managed Installer and ISG (External Authorization) are checked before processing the FileRules.
CipExternalAuthorizationCallback
This function contains the core functionality of SAC, and even thou it hasn’t changed much from 21H2 to 22H2, there’s a few details that make a big difference when SAC is enabled. Nonetheless, most of what we will discuss is meant to be used (And was already being used) by AppLocker and ISG, so on the bright side we will also learn a bit from that 🙂. To get an overview of how we got to this point, here’s the stack when we reach the External Authorization callback for the validation of an unsigned image.
0: kd> k
 # Child-SP          RetAddr               Call Site
00 fffffd0d`51916448 fffff803`24119485     CI!CipExternalAuthorizationCallback
01 fffffd0d`51916450 fffff803`2411dec8     CI!SIPolicyValidateImageInternal+0xbd
02 fffffd0d`51916580 fffff803`24104b8a     CI!SIPolicyObjectValidationEngine+0x150
03 fffffd0d`51916680 fffff803`240f8ad4     CI!CipApplySiPolicyEx+0x61e
04 fffffd0d`51916850 fffff803`240f4899     CI!CipApplySIPolicyUMCI+0x198
05 fffffd0d`519168c0 fffff803`240f2734     CI!CipValidateImageHash+0x441
06 fffffd0d`51916a00 fffff803`211a0535     CI!CiValidateImageHeader+0x934
07 fffffd0d`51916ba0 fffff803`2119ffc3     nt!SeValidateImageHeader+0xe9
08 fffffd0d`51916c50 fffff803`210dde43     nt!MiValidateSectionCreate+0x493
The function will start by checking the policy options Intelligent Security Graph Authorization or Managed Installer, if none of those options is set in then this function will exit and SIPolicyValidateImageInternal will proceed to process the policy FileRules – We will see this later in the post.
In case any of the options is set, the next step is to determine if the image is trusted based on the signing level. This is done by using the ValidatedSigningLevel obtained for the image and comparing this value against the bitmask with index 0xC inside the global variable g_CipWhichLevelComparisons.
Quick Note: The global variable
g_CipWhichLevelComparisonsstores a pointer to an array ofULONGs. Each value represents the level of comparisons that apply to this signing level. Is usually used together with the validated signing level to determine different actions/options for the image. For instance, for a validated signing level equal to “File Unsigned”, which would be index 1 in the array, the bitmask is0xFFFFFFFEso most of the times this bitmask is tested the result will be positive. In other instances, as mentioned above, the index is hardcoded in the code to only act on validated signing levels that match the bitmask for that index. The following table hopefully will help understand the correlation betweeng_CipWhichLevelComparisonsandValidatedSigningLevel
| ValidatedSigningLevel Value | ValidatedSigningLevel mask | g_CipWhichLevelComparisons bitmask |
|---|---|---|
| Signing level hasn’t yet been checked | 2^0 = 0x1 | 0xFFFFFFFF |
| File is unsigned | 2^1 = 0x2 | 0xFFFFFFFE |
| Trusted by WDAC policy | 2^2 = 0x4 | 0x5994 |
| Developer signed code | 2^3 = 0x8 | 0x59FC |
| Authenticode signed | 2^4 = 0x10 | 0x5970 |
| Microsoft Store signed app PPL | 2^5 = 0x20 | 0x5920 |
| Microsoft Store-signed | 2^6 = 0x40 | 0x5960 |
| Signed by an AV whose product is using AMPPL | 2^7 = 0x80 | 0x5080 |
| Microsoft signed | 2^8 = 0x100 | 0x5900 |
| Unknown | 2^9 = 0x200 | 0x59F4 |
| Unknown | 2^10 = 0x400 | 0x0 |
| Only used for signing of the .NET NGEN compiler | 2^11 = 0x800 | 0x800 |
| Windows signed | 2^12 = 0x1000 | 0x5000 |
| Unknown | 2^13 = 0x2000 | 0x0 |
| Windows TCB signed | 2^14 = 0x4000 | 0x4000 |
As can be seen in the table, index 0xC represents bitmask 0x5000 which means for “Windows Signed” & “Windows TCB signed”. Also the following two levels “Only used for signing of the .NET NGEN compiler” and “Signed by an AV whose product is using AMPPL” will also be included in the list of trusted images. From here the function will proceed to call CipCheckSmartlockerEAandProcessToken to obtain the first validation score.
I feel like this is a good moment to discuss namings, and hopefully someone from MS can reach out to me and clarify the namings. On one side we have
Smart App ControlandNights Watch, then we haveAppLockerwhere the internal name seems to beSmartLocker. There’re 4 different names for things that are the same or very similar. It’s definitely a bit confusing, especially when reversing 🤣
The function has the following prototype:
NTSTATUS
CipCheckSmartlockerEAandProcessToken(
        PFILE_OBJECT FileObject,
        PTOKEN TokenObject,
        PCI_VALIDATION_CTX ValidationCtx,
        bool IsTrustedSigning,
        PVALIDATE_SCORE Score
        );
This function has two paths, one of them always being executed and the other based on the boolean IsTrustedSigning. If not trusted, then the following EAs will be queried for the FileObject being validated – It also tries to obtain the same EAs from the current Process FileObject, but other than storing those in the Validation Context I don’t see them being used elsewhere.
- $Kernel.Smartlocker.Hash: Contains the Hash of the image
- $Kernel.Purge.Smartlocker.Valid: Boolean to determine if valid
- $Kernel.Smartlocker.OriginClaim: Contains the structure I named
EA_ORIGIN_CLAIM
typedef struct _EA_ORIGIN_CLAIM {
  INT32 DataVersion;
  INT32 Origin;
  INT32 Type;
  INT32 Generation;
  INT64 SessionId;
  INT64 field_18;
  INT64 SubSessionId;
  INT64 field_28;
  INT32 SmartScreenClaim;
  INT32 RevocationId;
  UNICODE_STRING FileName;
} EA_ORIGIN_CLAIM, *PEA_ORIGIN_CLAIM;
If a valid EA is obtained, then the OriginClaim structure will be checked to determine a score for the image. The Origin value will determine the first score, if Origin == 0, then Score |= 1, if Origin == 1, then Score |= 0x1002
I have to apologize here because I don’t have much info about this. This is most likely related to the special collection of rules in
AppLockerused by WDAC when theManaged Installeroption is set in the policy. From what I’ve seen, I knowappid.sysdoes set this EAs and another way to set this EAs is through the CI callbackCiSetCachedOriginClaim. This function gets called by the kernel when issuing the syscallNtSetCachedSigningLevelwith Flag0x2000, of course is not as easy as calling this syscall to set the EA OriginClaim, in case this syscall previous mode is UserMode, thenNtSetCachedSigningLevel2will make sure the request is coming from a Protected process.
The next step, whether we checked the EAs, is to obtain the OriginClaim stored in the Token object. In the case of the Token object, the OriginClaim is stored within the SecurityAttributes list of the token, these attributes are stored as Authz SecurityAttributes and can be queried/retrieved by name using the function SeQuerySecurityAttributesToken. In our case two security attributes will be looked for:
- SMARTLOCKER://ORIGINCLAIM
- SMARTLOCKER://SMARTSCREENORIGINCLAIMNOTINHERITED (New in 22H2, previously “SMARTLOCKER://SMARTSCREENORIGINCLAIM”)
The OriginClaim name will be looked up first. If found the score will be adjusted accordingly. Again, I don’t have much info on this nor do I have information on how the structure for this claim looks (appid.sys sets this value token).
Afterwards, the SmartScreen OriginClaim not inherited attribute will be queried, if it’s found and flag CLAIM_DANGEROUS_EXT (0x80) (I named this flag based on the check, is not an official name) is set then the function will proceed to check if the ImageFile has what’s considered a DangerousExtension. Also in all cases the code will check if the ImageFile has an InstallerExtension. For the Installer extension it will only check against .msi, for the case of Dangerous extension these are all the values:
// DangerousExtensions
".appref-ms"
".appx"
".appxbundle"
".bat"
".chm"
".cmd"
".com"
".cpl"
".dll"
".drv"
".gadget"
".hta"
".iso"
".js"
".jse"
".lnk"
".msc"
".msp"
".ocx"
".pif"
".ppkg"
".printerexport"
".ps1"
".rdp"
".reg"
".scf"
".scr"
".settingcontent-ms"
".sys"
".url"
".vb"
".vbe"
".vbs"
".vhd"
".vhdx"
".vxd"
".website"
".wsf"
".wsh"
If the ImageFile matches any of these values then the score will be set to DangerousExtension (0x800), and a query to Defender will be issued by calling CiCatDbSmartlockerDefenderCheck (We will discuss more about this function later).
The following pseudocode shows more or less how this last part for the SmartLocker not inherited attribute works
// sizeof(TOKEN_ORIGIN_CLAIM) == 0x20C
typedef struct _TOKEN_ORIGIN_CLAIM {
  ULONG Flags;
  WCHAR ImageFileName[MAX_PATH];
} TOKEN_ORIGIN_CLAIM;

PCLAIM_SECURITY_ATTRIBUTES_INFORMATION Attr = NULL;
RtlInitUnicodeString(&AttrName, L"SMARTLOCKER://SMARTSCREENORIGINCLAIMNOTINHERITED");

Status = SeQuerySecurityAttributesToken( Token, &AttrName, 1, Attr, AttrSize, &RetLen );
if ( NT_SUCCESS( Status ) ) { // Let's imagine it worked, no error check nor STATUS_BUFFER_TOO_SMALL check
  if( Attr->AttributeCount ) {
    // Not really this structure, the kernel uses a version of this but a bit modified
    PCLAIM_SECURITY_ATTRIBUTE_V1 AttrV1 = Attr->Attribute.pAttributeV1;
    if ( AttrV1->ValueType == CLAIM_SECURITY_ATTRIBUTE_TYPE_OCTET_STRING &&
        Attr->Values.pOctetString->ValueLength == sizeof(TOKEN_ORIGIN_CLAIM) ) {

      PTOKEN_ORIGIN_CLAIM Claim = Attr->Values.pOctetString->Value;
      // Copy Claim to ValidationCtx
      if ( Claim->Flags & CLAIM_DANGEROUS_EXT ) {
        auto isDangerExt = CipCheckForExtensionAgainstList( Claim->ImageFileName, DangerousExtensions );
        if ( isDangerExt )
          *Score |= DangerousExt;
      }
      auto isInstaller = CipCheckForExtensionAgainstList( Claim->ImageFileName, InstallerExtensions );

      if ( isDangerExt || isInstaller ) {
        RtlInitUnicodeString( &FileName, Claim->ImageFileName );
        CiCatDbSmartlockerDefenderCheck(
          &FileName,
          ValidationCtx->CurrentProcess,
          0,
          NULL,
          &ReplySize,
          &ReplyData, ...);
        // Based on the answer might remove the DangerousExt from the score
      }
    }
  }
}
Note: Based on how the values from this function are used later to populate the TraceLogging strings, we know that the Defender considers all this part of the evaluation process as:
IsDefenderShell.
This is more or less what we would have for a process being launched from explorer by double-clicking on it, right after the call to obtain the security attribute

Bonus Section: Where does this OriginClaim Token comes from (Click to Expand)
Just as a little bonus before going back into CipExternalAuthorizationCallback, I was quite curious on how or when this OriginClaim was being added into the token. So I dug a bit into it and ended up going into the following rabbit hole. First, we search and found the kernel has a reference to the SmartScreen OriginClaim string and that is being used in function SepAddTokenOriginClaim. In this function we see that the last parameter indicates if the token to add will be either:
- SMARTLOCKER://SMARTSCREENORIGINCLAIM -> Last parameter set to FALSE
- SMARTLOCKER://SMARTSCREENORIGINCLAIMNOTINHERITED -> Last parameter set to TRUE
We are interested in the latter, so we found that this function is being called with the last parameter set to TRUE from SeDuplicateTokenAndAddOriginClaim which comes from NtCreateUserProcess. We can see that the structure TOKEN_ORIGIN_CLAIM stored in the token is already passed to SeDuplicateTokenAndAddOriginClaim by NtCreateUserProcess. Tracing this argument back, we see it is part of the “Create Process Context” being allocated in PspBuildCreateProcessContext and actually when initializing this context this is taken from the PS_ATTRIBUTES_LIST for the attribute with value PS_ATTRIBUTE_SAFE_OPEN_PROMPT_ORIGIN_CLAIM (0x20017). To my surprise, this value actually comes from UserMode, so it’s not something created by the kernel.
Knowing that – And even thou I’m not a huge fan of reversing UserMode nor C++ – we had to check where this value was being added to the PS_ATTRIBUTES_LIST. We go straight to KernelBase and check CreateProcessInternalW, here we can find the function BasepConvertWin32AttributeList which seems to convert the Attributes from the UserMode value to KernelMode representation – See the image, the attribute size matches the size of the OriginClaim structure.

But we still don’t know where the TOKEN_ORIGIN_CLAIM comes from. KernelBase seems to get the AttributesList from the memory right after the StartupInfo – The size of STARTUPINFOW is actually 0x68, but before calling BasepConvertWin32AttributeList the code checks if StartupInfo->cb is equal to 0x70, if equal it means the value right after the size of STARTUPINFOW contains the list of attributes.
So let’s find who set up this value, in my case I just set a breakpoint in the point where the OriginClaim value was being converted to the Kernel type and checked the stack. We find that the DLL calling CreateProcessInternalW is windows.storage.dll (Microsoft WinRT Storage DLL). To make this a bit shorter, basically there’s two main classes involved in creating the process:
- CInvokeCreateProcessVerb
- CBindAndInvokeStaticVerb
The attributes are copied from CBindAndInvokeStaticVerb into CInvokeCreateProcessVerb when instantiating the class and later on, CInvokeCreateProcessVerb will copy them after the STARTUPINFOW and proceed to update the StartupInfo->cb from 0x68 to 0x70 – Check CInvokeCreateProcessVerb::CallCreateProcess.
So looking to find where CBindAndInvokeStaticVerb gets the attribute for the OriginClaim, we land in the class function CheckSmartScreen. This function calls internally to CheckSmartScreenWithAltFile which will do things like check if it should invoke SmartScreen, if the file is a symlink, get the DisplayName with SIGDN equal to SIGDN_FILESYSPATH or check if “IsWindowsLockdownDangerousExtensionEnforcement” is on (This last point is done by calling the external DLL Wldp.dll). It will then call into ZoneCheckFile which will do more checks like call AssocIsDangerous and check if “WindowsLockdownDangerousExtensionValidation” is on. Lastly it will call into the method SafeOpenPromptForShellExec from DLL shdocvw.dll, which determines the flags to set in the TOKEN_ORIGIN_CLAIM. Finally, a call into CInvokeCreateProcessVerb class method UpdateProcThreadAttribute will add the OriginClaim attribute into the PS_ATTRIBUTES_LIST.

Keep in mind that when SAC is enabled, some of the values from Reputation-Based protection (SmartScreen) are enabled by default and cannot be disabled. End of the Bonus! Back to
CipExternalAuthorizationCallback
That’s all for CipCheckSmartlockerEAandProcessToken and now we are back into CipExternalAuthorizationCallback with a score obtained from either the EAs, the Token or both.
From here on, we enter into the piece of code that was being used by the Intelligent Security Graph, that now has been extended to add some SAC functionality. First of all, the policy option Intelligent Security Graph Authorization will be checked again (If not set the function will exit with the value obtained from CipCheckSmartlockerEAandProcessToken). If the value is active in the policy, which is the case for SAC policies, the function will use the previously discussed IsTrustedSigning to determine if it should continue or not. If the image is trusted the following check will be done
- If the ValidatedSigningLevel is equal to “Signed by an AV whose product is using AMPPL (7)” and the policy has the value
VerifiedAndReputableAllowAntiMalware, then the score will be OR’ed with the valueAllowAntiMalware (0x100000)and the function will return.
If the image is not trusted then the function will proceed to query Defender. As mentioned previously, the function to issue a query to the defender is CiCatDbSmartlockerDefenderCheck. This function will receive two MPFILE_TRUST_EXTRA_INFO structures, one filled with the Request data and one to receive the Reply data. The code will also pass the FileName from the FileObject. The MPFILE_TRUST_EXTRA_INFO structure looks something like this – Some fields might be a bit off, I didn’t want to spend much time reversing the UserMode part of Defender 😄.
typedef struct _MP_INFO_RESULT {
  INT32 Unknown;
  ULONG32 ClientStatusCode;
  ULONG32 CloudHTTPCode;
  GUID EngineReportGUID;
} MP_INFO_RESULT, *PMP_INFO_RESULT;

typedef struct _MP_INFO_HASH {
  INT32 Reserved; // Must be 1
  INT32 Unknown;  // Set to 1 on Request and 0 on Reply
  struct HASH_DATA {
    ALG_ID AlgId;
    INT32 Size;
    BYTE Data[sizeof(Size)];
  };
} MP_INFO_HASH, *PMP_INFO_HASH;

enum MP_NW_CONTROL {
  SwitchNWOff = 0x2,
  SwitchNWToEnforcementMode = 0x4,
  IsUnfriendlyFile = 0x8 // Not really NW control, but it is here :D
}

union MP_EXTRA_INFO {
  MP_INFO_HASH HashData;
  MP_INFO_RESULT Result;
  MP_NW_CONTROL NightsWatchControl;
  PWCHAR PrivacyTag;
};

typedef struct _MPTRUST_INFO {
  INT32 Size;
  INT32 TrustLevel;
  INT64 Trust;
} MPTRUST_INFO, *PMPTRUST_INFO;

typedef struct _MPFILE_TRUST_EXTRA_INFO {
  INT32 RequestType;
  INT32 ReplyType;
  INT32 Size;
  PMP_EXTRA_INFO Information;
} MPFILE_TRUST_EXTRA_INFO, *PMPFILE_TRUST_EXTRA_INFO;
The communication between the parties is achieved using RPC. CI.dll will implement the Client and the Server will be implemented in cryptcatsvc.dll – For the record, the IID of the RPC stub is f50aac00-c7f3-428e-a022a6b71bfb9d43.
cryptcatsvc runs inside the service CryptSvc. Among the dispatch functions for the RPC server the following are interesting for our case:
- s_SSCatDBSmartlockerDefenderCheck (Already present in 22H1)
- s_SSCatDBSmartlockerDefenderCheck2 (New to 22H2)
- s_SSCatDBSendSmartAppControlBlockToast
- s_SSCatDBSendSmartAppControlSwitchEnforceToast
The big difference between the v1 and v2 of the SmartLockerDefenderCheck function, is that in v2 the function accepts a Request and Reply
MPFILE_TRUST_EXTRA_INFOas part of its arguments. Both function end up calling the helper functionCatDBSmartlockerDefenderCheckHelper
From these functions CI will call into s_SSCatDBSmartlockerDefenderCheck2 which will first load MpClient.dll
Note: On the first execution SmartLocker will be enabled in the Defender Config. The function will call into the
MpClientexported functionMpSmartLockerEnable. This function will simply register the Defender ELAM cert info (Opening a handle toWdboot.sysand calling InstallELAMCertificateInfo) and then using RPC it will call the methodServerMpEnableSmartLockerfromMpSvc.dll, which will check if SmartLockerMode is set in the Defender config and if not it will write it.
Once the handle to the library is opened, the function will use the filename provided by CI.dll to open a handle to the file which will be passed to the MpClient exported function MpQueryFileTrustByHandle2 – This function is only called if we come from DefenderCheck2, in case of the old version DefenderCheck, MpQueryFileTrustByHandle will be called instead.
Inside MpQueryFileTrustByHandle2, the code will use the handle to the file to create a file-mapping which will be used by the defender to do a memory scan on it. The following InSequence functions will be executed by issuing RPC calls from MpClient (Client) to MpSvc (Server) – Obviously all the function calls we just saw accept both MPFILE_TRUST_EXTRA_INFO set by CI.dll as part of their parameters.
- ServerMpRpcMemoryScanStart: Set up a
CMpMemScanContext&CMpMemScanEngineVfz(With GetAttributeTrustCheck as the GetAttributes function), and proceed with the scan asynchronously. - ServerMpRpcMemoryScanQueryNotification: Retrieve the Scan information.
- ServerMpRpcMemoryScanClose: Close and clean
CMpMemScanContext.
The internals of these functions are out of the scope of this post, to dig in the MpSvc and it’s ScanEngine we would require a few more posts 😄. The point I want to get across by mentioning this is that when SAC is enabled the Defender will be actively scanning files and making cloud queries.
From the information retrieved from the scan there’s three possible signals:
- 0x31001: Retrieved MPTRUST_INFO (IGS)
- 0x31002: Retrieved MPFILE_TRUST_EXTRA_INFO (SAC)
- 0x4005: Related to RSIG_VIRINFO
Lastly to finish with the Defender communication the following image shows both the Client (CI) & Server (cryptcatsvc) stacks when the code reaches the Defender.

One thing to mention here is that if we have SAC in enforce state and we don’t have an internet connection in the machine then the default action is to block the process, and a notification saying “Smart App Control is unable to verify this app. Please check your internet connection and try again” will be displayed.
Back to the external authorization callback, if the RPC call failed, the policy setting VerifiedAndReputableAllowUnknown is not set and the ValidateSigningLevel is none of the following:
- Microsoft Store signed app PPL (Protected Process Light)
- Microsoft Store-signed
- Microsoft signed
- Windows signed
- Only used for signing of the .NET NGEN compiler
- Windows Trusted Computing Base signed
then the validation score will be OR’ed with the value Unattainable (0x40000) and the function will return. In case the RPC call was successful, then function CiHandleDefenderSignals will be called. As the name implies this function will handle the messages sent back by the Defender. It will iterate the count of elements returned, where each element is of type MPFILE_TRUST_EXTRA_INFO. Based on the ReplyType field it will perform different actions. The two more interesting cases are: First, when a trust result is returned. In this case Information will point to a MP_INFO_RESULT, and the values from it will be copied to the Validation Context:

The second interesting case is where Information points to a MP_NW_CONTROL enum. In this case, based on the Control command the feature will be either disabled or switched to enforce mode. This will basically update the VerifiedAndReputablePolicyState RegKey and update the policies in a WorkItem

In the case we are changing from the learning mode to the enforce mode an RPC call to function
s_SSCatDBSendSmartAppControlSwitchEnforceToastwill be issued. Within this function, the DLLwldp.dllwill be loaded to then call functionWldpSendSmartAppControlSwitchEnforceToast.
After coming back from the signal handling routine, there’s a little nuance. If the NW control command had the flag IsUnfriendlyFile set, then the Score will be updated with value UnfriendlyFile (0x80000) and the function will return. If the flag is not set then the TrustInfo along with the FileObject will be passed into function CipSetFileCache with flag 0x82 which means the EA $Kernel.Purge.CIpCache will be used to store this info.
Lastly, the Score needs to be adjusted based on the trust returned by the Defender. There’s 5 options here:
- Trust == 1: The score will be OR’ed with the value
0x202– I don’t know much about this value 😕 - Trust == -1 (0xFFFFFFFF): If the policy setting VerifiedAndReputableAllowUnknown is set then score will be OR’ed with the value
AllowUnknown (0x20000) - Trust == -2 (0xFFFFFFFE): The score will be OR’ed with the value
Malicious (0x80) - Trust == -3 (0xFFFFFFFD): The score will be OR’ed with the value
PUA (0x100) - Any other case, the score will be OR’ed with the value
0x42.
And that’s pretty much all for the external authorization callback, now we go back to SIPolicyValidateImageInternal from where the external authorization callback was called!
SIPolicyValidateImageInternal
Before we jumped into the external authorization callback, we discuss how the SIPolicyObjectValidationEngine function iterates over the policies and calls into the internal SIPolicyValidateImageInternal which will later call the external auth callback. So now, after the callback was called we are back into SIPolicyValidateImageInternal with the validation score returned from it. If SAC is enabled then the function will proceed to evaluate the score, and both propagate this score to the validation engine score and set the NTSTATUS accordingly to the score.

As can be seen in the image, in most of the branches it will set the respective NTSTATUS as the validation status and then it will jump into what I called ProcessDbgAndReprieve. This is no more than a method that will check if the Kernel debugger is attached to log the policy violation in the debugger console. Similar to this output (Just an example, this is coming from another point, that’s why the error code doesn’t match the ones seen above):
kd> g
KDTARGET: Refreshing KD connection

************************************************************************************
*  \Device\HarddiskVolume3\Users\n4r1B\Desktop\usbview.exe violated CI base policy {0283ac0f-fff1-49ae-ada1-8a933130cad6}.CIP with error code 0xc0e90002 for scenario 1.
*  It is now allowed to load because debugger is attached.
************************************************************************************
In case none of the branches from the previous image is followed – Or the case where the score is Unattainable but AllowUnknown is set – the function will proceed to evaluate the object against the Policy Rules. The file rules will be checked first, this will be done inside the function SIPolicyMatchFileRules. This function will receive, among other things, the following parameters:
- Policy with the file rules to evaluate
- The value of the scenario to evaluate
- OriginalFileName
- InternalName
- FileDescription
- ProductName
I strongly recommend reading the whole Section “Understand Windows Defender Application Control (WDAC) policy rules and file rules” of the MSDN to learn more about Policy Rules and the different options that can be used for them.
In a similar fashion as we saw in Part 1 with the Policy Secure Settings, the function will set up a structure with the data that will pass as the key to the function bsearch. The key structure has the following prototype
typedef struct _POLICY_BINARY_DATA {
  INT32 Size;
  PVOID Data;
} POLICY_BINARY_DATA, PPOLICY_BINARY_DATA;

//
// Sorry I don't have much more info than to what Version of policy each string correlates :(
//
typedef struct _POLICY_STRING_DATA {
  INT32 StringType;
  UNICODE_STRING String;
  UNICODE_STRING StringPolicyV4;
  UNICODE_STRING String1PolicyV4;
  UNICODE_STRING String2PolicyV4;
  UNICODE_STRING StringPolicyV7;
  UNICODE_STRING StringPolicyV5;
  PVOID DataPolicyV5;
  PVOID V3DataStart;
  PVOID V3DataEnd;
  INT32 StringsCountPolicyV3;
  PUNICODE_STRING StringsPolicyV3;
  POLICY_BINARY_DATA BinaryData;
} POLICY_STRING_DATA, *PPOLICY_STRING_DATA;

typedef struct _SEARCH_FILE_RULES_KEY {
  INT32 PolicyStringsVersion;
  PUNICODE_STRING OriginalFileName;
  PUNICODE_STRING InternalName;
  PUNICODE_STRING FileDescription;
  PUNICODE_STRING ProductName;
  PUNICODE_STRING AppxPackageString;
  PPOLICY_STRING_DATA PolicyStringsData;
} SEARCH_FILE_RULES_KEY, *PSEARCH_FILE_RULES_KEY;
The base and the num for the bsearch function will be taken from the SI_POLICY structure. When the policy is parsed into the SI_POLICY structure, an array with two scenarios is set up. Each scenario contains it’s specific File Rules, Allowed Signers, Denied Signers and Exception Rules. As I mentioned above, when calling SIPolicyMatchFileRules the specific number of the scenario to evaluate is passed to the function. This number will work as an index for the function to know which element of the Scenarios array to pick. Each scenario is represented by the following structure
typedef struct _SI_RULES {
  PUINT32 IndexArray[];
  UITN64 field_8;
  UINT64 field_10;
  INT32 Count;
} SI_RULES, *PSI_RULES;

typedef struct _SI_POLICY_SIGNERS_RULES {
  SI_RULES Rules;
  UINT64 field_20;
  SI_RULES ExceptionRules;
  PVOID field_48;
  PVOID field_50;
} SI_POLICY_SIGNERS_RULES, *PSI_POLICY_SIGNERS_RULES;

typedef struct _SI_FILE_RULES {
  SI_RULES Rules;
  UINT64 field_20;
} SI_FILE_RULES, *PSI_FILE_RULES;

typedef struct _SI_POLICY_SCENARIO {
  UINT32 AlgId;
  SI_POLICY_SIGNERS_RULES AllowedSignersRules;
  SI_POLICY_SIGNERS_RULES DeniedSignersRules;
  SI_FILE_RULES FileRules;
} SI_POLICY_SCENARIO, *PSI_POLICY_SCENARIO;
If no FileName level file-rule matches, then the function will proceed to evaluate the file-rules that are at Hash level

If either the FileName or the Hash matches then the SIPolicyMatchFileRules returns TRUE, and the validation status will be set to STATUS_SYSTEM_INTEGRITY_POLICY_VIOLATION.
If curious on what Hashes and FileNames are being used by the SAC policies, you can check the whole list under the FileRules tag of the policy.
If no file-rule matched, the next step, if the image is signed, is to verify the signature chain info against the Denied and Allowed signers. First, the denied signers will be checked. If a rule matches in this point, same as previously, the function will set the validation status to STATUS_SYSTEM_INTEGRITY_POLICY_VIOLATION. If no denied signers rule matches, the code will proceed to check the allowed signer rules. In this case if there’s a match any previous status/score will be cleared. The process of verifying the image signature against the policy signatures is mainly done inside the function SIPolicyValidateChainAgainstSigner. This function will receive as it’s first parameter the SI_CHAIN_INFO of the image and in @r8 it will receive a POLICY_SIGNERS_DATA.
With regard to this POLICY_SIGNERS_DATA structure, basically the SI_POLICY structure keeps an array of POLICY_SIGNERS_DATA. These represent all the Allow and Deny signatures for both scenarios. The way the code knows which rules apply to which scenario, meaning which index of the POLICY_SIGNERS_DATA array to use is quite clever – And It’s something I didn’t explain before with the file rules, so now it’s a good moment to check it – If you go back and check the SI_POLICY_SCENARIO structure, you’ll see that for each rule type structure (File, Allow, Deny) there’s a SI_RULES structure that contains a field I called IndexArray. Basically this is an array of indexes that indicate which index from the arrays with the data has to be used for this specific scenario and rule. Let’s see a quick pseudocode snippet to understand this a bit better
// Imagine we want to check for scenario 1, the Allowed signatures using `SIPolicyValidateChainAgainstSigner`
PSI_POLICY Policy; // Let's assume we have the handle to the policy here
PSI_POLICY_SCENARIO Scenario = Policy->ScenariosRules[1]; // Get the Scenario 1
PSI_POLICY_SIGNERS_RULES AllowSigRules = Scenario->AllowedSignersRules; // Get Allowed Signatures for scenario 1

while ( i < AllowSigRules->Rules.Count ) { // Iterate all the Allowed Signature Rules
  INT32 Index = AllowSigRules->Rules.IndexArray[i]; // Get the index that will be used to
                                                    // obtain the PolicySignersData from the Policy
  PPOLICY_SIGNERS_DATA AllowSigData = Policy->PolicySignersData[Index]; // Get the PolicySignersData

  // AllowSigData has the PolicySignerData for the First Allowed Signature of Scenario 1
  // same behavior is used for Denied signatures and File-Rules (Getting a ptr to POLICY_STRING_DATA)
  if ( SIPolicyValidateChainAgainstSigner( ChainInfo, AllowSigData ) ) {
    // A match was found
    break;
  }
  i++;
}
This might not be 100% accurate and I’m omitting quite a few sanity checks that are done in the middle, but I hope the idea gets across.
To understand a bit better how the signatures are verified, up next you can find the prototype of the POLICY_SIGNERS_DATA – Remember this will apply both for Allowed and Denied Signers.
typedef struc _POLICY_SIGNERS_DATA {
  INT32 Type;
  UINT32 AlgId;
  POLICY_BINARY_DATA Value;
  INT32 EkusCount;
  INT32 EkuBufferLen;
  PVOID EkuBuffer;
  UNICODE_STRING IssuedBy;
  UNICODE_STRING IssuedTo;
  UNICODE_STRING field_48;
  PVOID SignersDataV3;
  ULONG FileRuleCount;
  PUINT32 FileRuleIndexArray[]; // Same as the SI_RULES->IndexArray
} POLICY_SIGNERS_DATA, *PPOLICY_SIGNERS_DATA;
Seeing the SI_CHAIN_INFO and the POLICY_SIGNERS_DATA you can more or less get an idea on how the comparison gets done in the function SIPolicyValidateChainAgainstSigner. Finally to sum up the validation of the Signers rules, here’s an image taken at the entry of the SIPolicyValidateChainAgainstSigner when validating ProcessHacker with the SAC enforce policy.

To be honest, to reach to the point of this image I had to modify the codeflow a bit. Since on the first signature check the Type would match and then it would exit the loop. I wanted to reach this point since there’s more info in this
POLICY_SIGNERS_DATAthan in the first one checked. On the first oned checked, the only filled value is the Type (Set to0x14). I’ve tried to find information with regard to this Type value but I can’t find anything. If someone knows more about this, please reach out 🙂!!
So after this whole process is run for every active policy and supplemental policy, we will be back into the function CipApplySiPolicyEx with a CI_VALIDATION_RESULT for each BasePolicy. The results from the supplemental policies are written into the same CI_VALIDATION_RESULT as the BasePolicy. At this point the function won’t do much more than iterate the validation results storing those in the Validation Context. Also at this point the SmartLocker event will be logged inside the function CiLogSIPolicySmartlockerEvent. Four type of events can be logged here:
- SmartlockerOperationalAudit (EventId: 3091)
- SmartlockerOperationalFailure (EventId: 3092)
- SmartlockerVerbose (EventId: 3088)
- SmartlockerOperationalSuccess (EventId: 3090)

We are almost done, now we will go up the call stack, propagating the validation status to functions above. Finally, we will get back to the CI entrypoint CiValidateImageHeader, as before there’s not much more we are gonna discuss in this function. Only interesting point regarding SAC, is that in case the SigningLevel matches any of the following:
- Signing level hasn’t yet been checked
- File is unsigned
- Trusted by Windows Defender Application Control policy
- Developer signed code
and the SAC result is to allow the execution, then the operation will be logged using the function CipInstrumentNightsWatchAllow. This function can write four TraceLogging-based events for providers CodeIntegrity.NWActivityVerbose & CodeIntegrity.NWActivity with the following names.
EventName
---------
QuestionableAllow
OriginClaimData
Allow
QuestionableAllowSignatureInfo
When this function executes either QuestionableAllow or Allow will be logged. If the path to log QuestionableAllow is taken then QuestionableAllowSignatureInfo & OriginClaimData will also be written if the required data is available.
Since these are Trace-Logging based events we need to do some magic to capture the traces. Thankfully for us mortals Matt has already done all the hard work of researching & documenting the process to get this type of events. Take a look at his post Windows RE using WPP and TraceLogging. Following the post, we can use the following 4 lines in powershell to start an ETW session that will capture both the NWActivity and the NWActivityVerbose providers.
New-EtwTraceSession -Name NWTrace -LogFileMode 0x08000100 -FlushTimer 1
# Add Microsoft.Windows.Security.CodeIntegrity.NWActivityVerbose
Add-EtwTraceProvider -SessionName NWTrace -Guid ‘{3a82f218-fcc2-4183-afe9-a0febc4416ee}’ -MatchAnyKeyword 0xFFFFFFFFFFFF -Level 0xFF -Property 0x40
# Add Microsoft.Windows.Security.CodeIntegrity.NWActivity
Add-EtwTraceProvider -SessionName NWTrace -Guid ‘{28dcc28b-3e31-527b-efd6-b4cc4d73d158}’ -MatchAnyKeyword 0xFFFFFFFFFFFF -Level 0xFF -Property 0x40
tracerpt -rt NWTrace -o NWTrace.evtx -of EVTX
After starting the traces and playing around with some apps/installers you should have an EventLog that can be opened with EventViewer and you can find out things like that the Defender finally trusts ProcessHacker 😝!!

This is going to be all for today, although I’ll re-visit the CI for sure to write more about the Cache or HVCI. There’s still some things that I didn’t discuss but I’ll leave that as an exercise for the reader – If curious check things like CiGetCodeIntegrityOriginClaimForFileObject & CiDeleteCodeIntegrityOriginClaimMembers🙂.
Conclusion
If you made it all the way here, thank you 😅!! Sorry for the extremely long post, but I really wanted to dig deep into this feature and try to dissect as much as possible. I’m pretty sure I still missed many things, and also I might be wrong in some, but hopefully this series of post will help you get a better understanding of SAC internals (And everything around it like CI, policies, AppLocker, etc…).
As I mentioned in the beginning, I didn’t look into how the system will learn during the evaluation part and this might be a crucial part of the feature. Hopefully somebody (or me) will write about this so we can learn even more about SAC. I’m saying that the learning process is critical, because from my experience with the Enforce mode ON the feature is quite restrictive. But again the learning process might modify some parts of how the feature works.
Personally I think the steps MS is taking to improve security in the OS, with the end goal of making users more safe, are great. On the other hand, I do see some resembles between SAC and Windows 10 S, and even thou Windows 10 S had potential, the idea of limiting the users to only use Apps from the Windows Store was very restrictive (Let’s not even discuss how much MS has pushed for the Windows Store without a very good reception from Users/Devs which made it even more difficult for this feature). In the case of SAC, when set to enforce, the limits are set by either the app having a digital signature or, if no signature, then to what the Defender cloud considers trusted. The first option, even thou I understand that digital signatures verifies the app pretty well, many open-source projects or freelance developers are not able to afford this and this unfortunately impose some restrictions into devs. That’s when we reach the second option, the query to the “Intelligent Cloud Security Service” and this is where I wish Microsoft was giving more information, since basically the decision of an app being able to run or not will be solemly on hands of MS. To be fair I don’t know the internals of the “Cloud Security Service” nor how is trained or if the data might be coming from multiple external sources. But I feel like many AV vendors will definitely want to be a part of this or at least have a chance to control some decisions, what if an AV different to the Defender is running in the machine and has a list of exclusions that is actually blocked by SAC, this will definitely confuse the customer. Nonetheless, many people might consider this as MS trying to lock-out competing AV vendors by giving more power to the Defender even when another AV is running as the main Antimalware product in the PC (For instance, previously MS was using the naming side-by-side when running Defender and another AV, now the naming seems to be Hybrid-mode). Anyways that’s just how I think some AV vendors might take this feature (To some this might resseamble NGSCB), personally, as I mentioned before I truly believe the steps MS is making to protect the end user (VBS, FASR, SAC, etc..) are great 🙂.
Unfotunately, I think at first SAC won’t be enabled in many machines. This could lead to SAC just being a passive passenger in the OS, and the fact that it can’t be re-enabled without resseting the PC will surely help it staying disabled. If Microsoft is really pushing for this feature this might present the dilemma of them thinking to either enforce SAC, or maybe give the option to add exclusions (Which I don’t think will happen since it defeats the purpose of the feature). In any case, this is purely speculation, when the feature is actually released we will see the real impact/reception. I do belive that for the Windows average user this might be a killer feature, though I’d like to see how many people disable the feature because they want to execute somethig without fully understanding that they cannot re-enable it. There’s also the enterprise point of view, where I wonder what type of control will IT admins have over SAC, if it will be possible to apply it for certain Users/Groups but disable it for others. However I’m pretty sure Microsoft has already thought about many of this things so I’m really looking forward to the future of SAC.
As always, if there’s any mistake or something not clear, please don’t hesitate to reach out to me on twitter @n4r1b. I’m back 🥳!!
Nights Watch SAC Smart App Control Windows Defender Microsoft Security CI AppLocker SmartLocker
Nights Watch SAC Smart App Control Windows Defender Microsoft Security CI AppLocker SmartLocker
7313 Words
2022-09-08 00:00 +0000 (Last updated: 2023-03-29 21:23 +0000)
bbee2f6 @ 2023-03-29