20 minutes
Smart App Control Internals (Part 1)
After more than two years I’m back!! Unfortunately, last two years work & life happened and I didn’t have the time to continue writing. But things are a bit easier right now, so I’m making a comeback 😄. And what a better topic for a comeback than, one of the biggest upcoming security features for Windows: Smart App Control – From now on I will use Smart App Control and SAC interchangeably.
As always in my blog, I will try to go deep into the internals of how this feature works. This time I will summarize everything two or three posts.
With regard to the structure, I’ll divide the research in two parts. In the first part we’ll see a quick introduction of the feature and the internals of how SAC is initialized. In the second part we’ll see how SAC enforce the actions and the conclusions. Also, I’ll add an appendix to share gists with main structures I’ve used during the research and both SAC policies in XML format.
Disclaimer: By any means I’m an expert on Windows Policies and CI, so I might mention things that are already well-know for people that play with Policies on a daily basis. For me it was all very new. On the bright side I learnt quite a bit with this research.
Also, before starting, huge thanks to Matt Graeber for all the information he has written about CI/Policies. It has been very helpful. And of course, to the people at MS that documented how to work/interact with Policies, there’s a vast amount of information!!
Introduction
So what is this “Smart App Control” feature and why do I consider it as one of the biggest security features coming to Windows. Basically, SAC is a feature inherent to the OS – Keep this in mind, this is a feature from the OS – that when enabled will block malicious or untrusted apps. This is very similar, arguably we could say is the same, to AppLocker, but imagine MS being the one that wrote the rules/policy.
Smart App Control is expected to be released with Windows 22H2, which should be released in late September this year. This is already available in the Release Preview Channel. For this post I’ve done all the research on Build 22621 from the Beta channel.
SAC has three possible states and only one of them will enforce the actions:
- Enforce: Blocking of malicious or untrusted apps will be enforced – State = 1.
- Evaluation: In this mode the feature will keep evaluating if your system is a good candidate for the feature to be in enforce mode – State = 2.
- Off: The feature is disabled. Once disabled it can’t be activated again unless you do a fresh install of the OS – State = 0.
Disclaimer: In this post I won’t be discussing how does the feature determine if the endpoint is suitable for the enforce mode. That’s something I still need to research and I left it apart for now.
Microsoft considers a good candidate someone to whom the feature “won’t get in it’s way too often”. Unfortunately MS is not giving us any more information with regard to the evaluation mode. The evaluation mode can switch the feature to both Enforce or Off state. But the user can always decide to disable the feature (Opt-In model) – As mentioned above, this implies not being able to enable it again unless re-installing the OS.
If we refer to the Microsoft documentation on SAC. We can find that at the moment exclusions are not going to be allowed. There’s no way to let an application bypass SAC once the feature is in enforce mode. This means untrusted nor malicious apps won’t have a way to execute. On the other hand, this might also block certain legitimate apps that are not signed or the MS cloud security doesn’t have a reputation for them.
Please refer to the document What is Smart App Control? to learn more about the basics of the feature.
SAC Install
Getting into how this gets installed. This feature requires a fresh install in order to be activated. If we mount the ISO for Build 22621 and navigate through the install.wim to the folder containing the registry hives, then we can load the SYSTEM Hive into the Registry Editor. Within the CI\Policy key we can find the Value VerifiedAndReputablePolicyState set to 2 (Evaluation state).

Also within the CI key we have the SubKey Protected where we can find the following value VerifiedAndReputablePolicyStateMinValueSeen also set to 2.

Later we will see more on how these keys are used to control the actual state of SAC, and we will also see how the values under the
ProtectedSubKey are guarded to avoid tampering.
Before ending this section let’s see what happens in case of an OS upgrade. In order to enforce this when upgrading, we can see the install ISO has the following code in the replace manifest for the CI – [ISO]\sources\replacementmanifests\codeintegrity-repl.man.
<addObjects>
  <conditions>
    <condition negation="Yes">MigXmlHelper.DoesObjectExist("Registry", "HKLM\SYSTEM\CurrentControlSet\Control\CI\Policy [VerifiedAndReputablePolicyState]")</condition>
  </conditions>
  <object>
    <location type="Registry">HKLM\SYSTEM\CurrentControlSet\Control\CI\Policy [VerifiedAndReputablePolicyState]</location>
    <attributes>dword</attributes>
    <bytes>00000000</bytes>
  </object>
</addObjects>
When upgrading the OS this piece of code will check if the Registry value HKLM\SYSTEM\CurrentControlSet\Control\CI\Policy\VerifiedAndReputablePolicyState exist, if it doesn’t it will be created with the SAC state 0 (Off state).
Aside from these two new registry values, the OS will ship with two new System Integrity policy files (.cip) within the System32\CodeIntegrity\CiPolicies folder.
- PolicyGUID:
{0283AC0F-FFF1-49AE-ADA1-8A933130CAD6}Enforce SAC policy, active when SAC state is set to enforce (1) - PolicyGUID:
{1283AC0F-FFF1-49AE-ADA1-8A933130CAD6}Eval SAC policy, active when SAC state is set to evaluation (2)
Using the CIPolicyParser script from the WDACTools, we convert both .cip files into their .xml representation. From the XML we can take the Policy Rules to get an idea of the options of these Policies. The following Rules are set – Both XMLs files can be found in the Appendix.
- Enabled:UMCI
- Enabled:Intelligent Security Graph Authorization
- Enabled:Developer Mode Dynamic Code Trust
- Enabled:Allow Supplemental Policies
- Enabled:Revoked Expired As Unsigned
- Enabled:Inherit Default Policy
- Enabled:Unsigned System Integrity Policy
- Enabled:Advanced Boot Options Menu
- Disabled:Script Enforcement
- Enabled:Update Policy No Reboot
- Enabled:Conditional Windows Lockdown Policy
- Enabled:Audit Mode (Only in the SAC Evaluation Policy)
Lastly, we can search inside the System32 folder to find binaries/modules that make use of the previously mentioned registry values.

SAC Initialization
We will split this section into two stages. The first stage we will talk about SAC during the Windows loader. The second stage we will talk about SAC during the OS initialization. It’s important to understand that both the loader and the OS play a role in enabling SAC. Finally, I’ll add a section to explain how the protection of the values under the SubKey CI\Protected works.
The following simple diagram shows at high level the SAC initialization flow for the aforementioned stages.
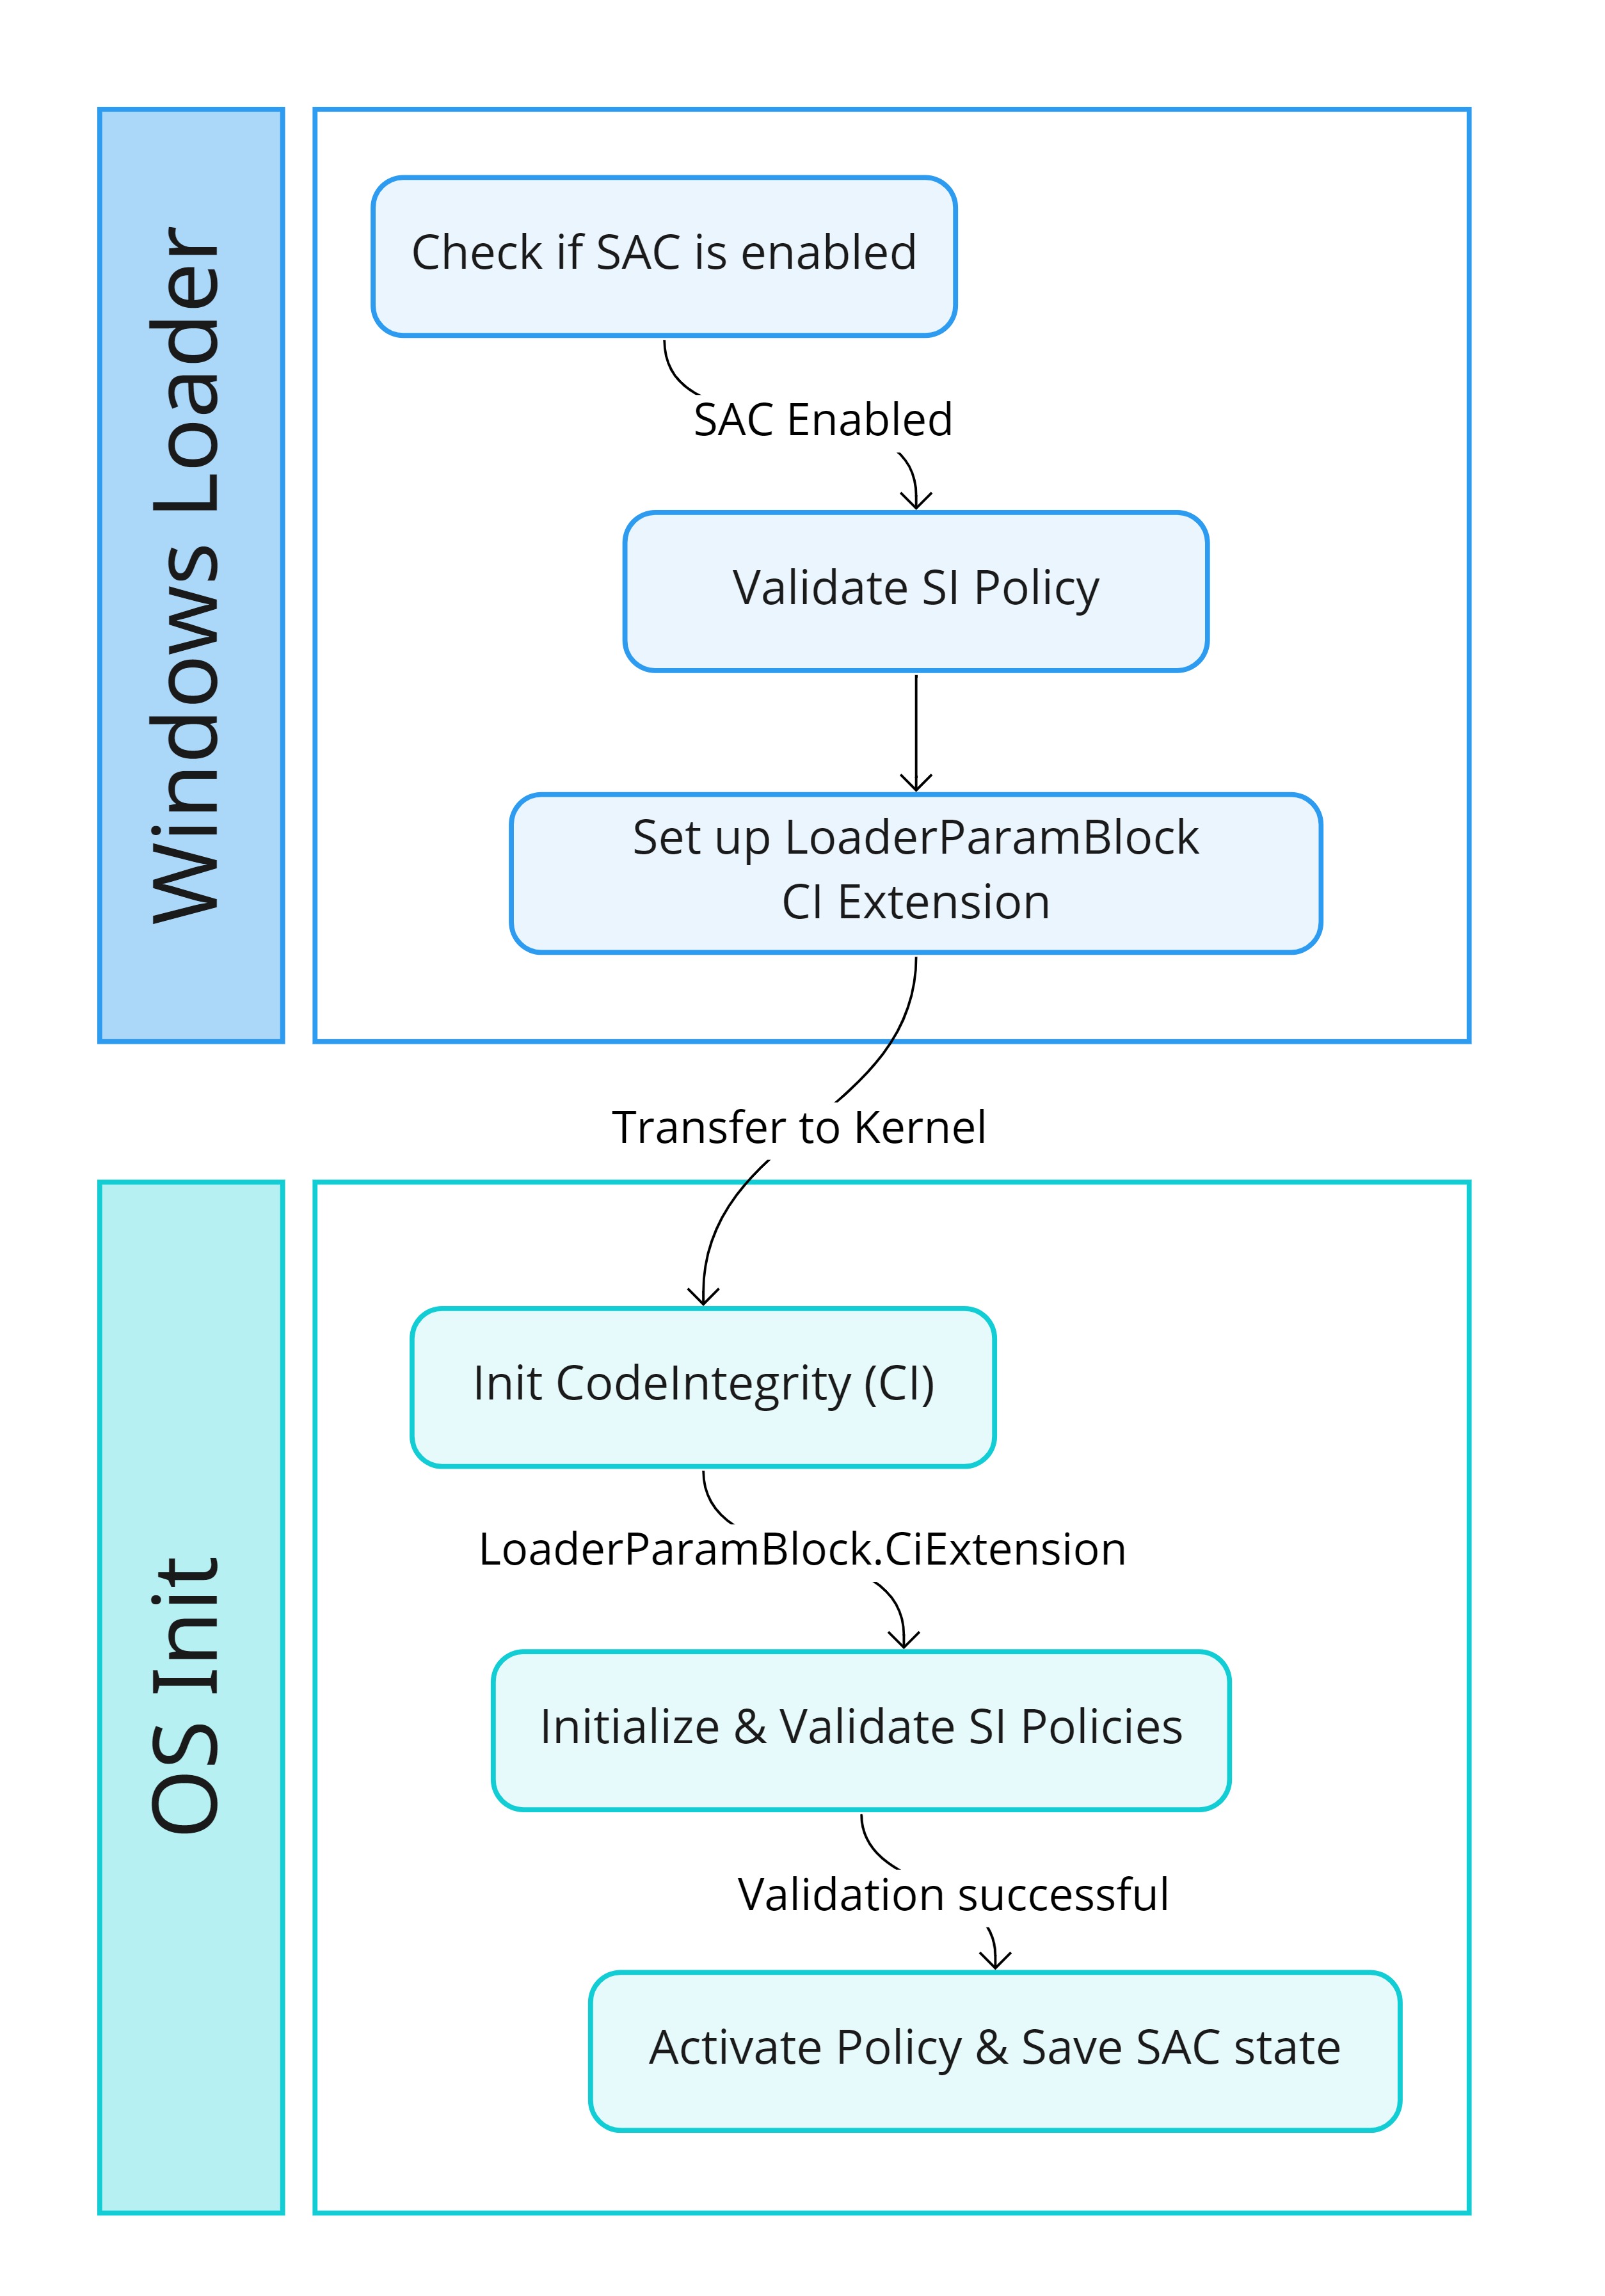
SAC during Winload
In this section we will discuss how the SAC policy for the active SAC state gets chosen, how the persistence and coherency between RegKeys is enforce by Winload and how the SAC policy is passed to the kernel.
The diagram below presents a high level representation of what we will see during this section.

First step for SAC initialization comes early during the OS loader process. More specifically right after the load of the SystemHive during the preparation of the target (OslPrepareTarget). The function OslpProcessSIPolicy will be called in order to process the System Integrity policies. Within this function the conditional policies – SKU, EMode, SAC Enforce, SAC Evaluation – will be evaluated to see if they should be ignored or unlocked. Microsoft considers these four policies conditional because they can be Ignore/Unlocked, unlike other policies like the “MS Windows Driver Policy” which always apply. The policiesGUIDs for the conditional policies are stored in a global array defined by the symbol g_SiConditionalPolicies.
The difference between Ignore and Unlock is very subtle. The Unlock flag will be always checked. On the other hand, the Ignore flag will only be checked for Policies where “Enabled:Unsigned System Integrity Policy” is not set. At the moment Ignore and Unlock match 1 to 1.
To determine whether SAC should be enabled for either Enforce or Evaluation, the following two functions are used.
OslpShouldIgnoreUnlockableNightsWatchDesktopEnforcePolicyOslpShouldIgnoreUnlockableNightsWatchDesktopEvalPolicy
This is the first time that we will see the reference Nights Watch to denote SAC, this seem to be the internal microsoft name.
These two functions behave in the same way, the only difference being that they provide a different PolicyGUID to the internal evaluation function:
bool  // Return value indicates if unlockable or not
OslpShouldIgnoreUnlockableNightsWatchDesktopPolicy(
  PGUID PolicyGUID, // The PolicyGUID matches the name of the `.cip` files we mentioned above
  HANDLE SystemHive,
  PBOOL Active, // If true policy is active
  PBOOL Ignore  // If true policy should be ignored
  );
This function uses the PolicyGUID parameter to determine which SAC state to check. It calls OslpGetNightsWatchDesktopRegKeyState, which returns the actual SAC state in the machine. If the actual SAC state matches the one being evaluated, then this Policy is considered active – This is an over simplification. There’s a few more checks as if the device is WinPE or if a signed policy is required. These checks can make the function return Ignore and Unlockable even if the registry indicates SAC is active.
The behavior of OslpGetNightsWatchDesktopRegKeyState is worth taking a look. This routine is liable of keeping SAC enabled across reboots and keeping the coherency between both registry values. This routine has four possible scenarios:
VerifiedAndReputablePolicyState == VerifiedAndReputablePolicyStateMinValueSeen: Values are the same, so return the value directly.
VerifiedAndReputablePolicyState < VerifiedAndReputablePolicyStateMinValueSeen: During the previous boot-session the SAC state was modified. We return the value from
VerifiedAndReputablePolicyStateand update the value under theProtectedSubKey.VerifiedAndReputablePolicyState > VerifiedAndReputablePolicyStateMinValueSeen: This is a corner case, since
VerifiedAndReputablePolicyStateshould never be bigger than the value under theProtectedkey. I believe this is here to keep the coherency between both values if someone manually edits the valueVerifiedAndReputablePolicyState.Either value is 3 or more: This indicates an Invalid state transition and the function will fail.
The following pseudo-code summarize it.
...
Status = OslGetDWordValue(SystemHive, PolicySubkey, L"VerifiedAndReputablePolicyState", &NWState);
Status = OslGetDWordValue(SystemHive, ProtectedSubkey, L"VerifiedAndReputablePolicyStateMinValueSeen", &NWMinValSeen);

if ( NT_SUCCESS( Status ) ) {
  if ( NWState <= NWMinValSeen ) {
    *SACState = NWState;
    if ( NWState < 3 ) {

      if ( NWState >= NWMinValSeen )
        return STATUS_SUCCESS;

      return OslHiveReadWriteDword( SystemHive, 1, ProtectedSubkey, L"VerifiedAndReputablePolicyStateMinValueSeen", SACState );
    }
  }
  else {
    *SACState = NWMinValSeen;
    if ( NWMinValSeen <= 2 )
      return OslHiveReadWriteDword( SystemHive, 1, PolicySubkey, L"VerifiedAndReputablePolicyState", SACState );
  }
  return STATUS_INVALID_STATE_TRANSITION;
}
When there’s a SAC state change by using the Security App. The OS will write to the VerifiedAndReputablePolicyState. After the user reboots this state will be persistent in the machine. This means that after a SAC state transition one can still edit the VerifiedAndReputablePolicyState and the transition won’t be persistent across the next reboot. This makes me think MS will trigger transitions from Evaluation mode only when installing updates or they will ask for a reboot. Obviously, during the session when there’s a SAC state transition the active policies will be updated.
Once all the conditional policies have been checked to see if they are unlockable or should be ignored. The values obtained from each function will be written into the following two globals:
- g_SIPolicyConditionalPolicyConditionUnlockHasBeenMet
- g_SIPolicyConditionalPolicyConditionIgnoreHasBeenMet
The value written into these globals is a four byte array that can be represented with the following struct
typedef struct _SI_POLICY_MODES {
  BOOLEAN SkuPolicy;    // Policy used when Windows is running in S mode
  BOOLEAN EModePolicy;  // I can't find any information about EMode, please reach out if you know more
  BOOLEAN NightsWatchDesktopEnforce;
  BOOLEAN NightsWatchDesktopEval;
} SI_POLICY_MODES, *PSI_POLICY_MODES;
After this, the loader will try to parse the policy files. First by loading the serialized data from every .cip file into memory (See BlSIPolicyGetAllPolicyFiles). Then parsing the data from each file inside SIPolicyParsePolicyData – If anyone is interested in the details check SIPolicyInitialize to see how every section of the Policy is parsed into a structure. In Part 2 we will talk more about this structure and it’s data.
Once the policy is parsed both the ignore and Unlock conditions will be checked to see if they are met. In case a condition is met, the policy will be discarded. In case none of the conditions is met, then the policy will be set as active using the function SIPolicySetAndUpdateActivePolicy.
In case the Policy Option “Enabled:Unsigned System Integrity Policy” is set then the PolicyVersion and the PolicySignersData will be deleted from the EFI SecureBoot private namespace. The deleted variable name will be composed by concatenating the PolicyGUID plus the PolicyVersion/PolicySignersData string – These EFI variables are created only when the PolicyOptions have “Enabled:Unsigned System Integrity Policy” disabled.
In the following output we can see how SetVariable is being called with size 0 which would cause the variable to be deleted if found.
[SetVariable][VendorGUID: 77FA9ABD-0359-4D32-BD60-28F4E78F784B] Variable: "{0283ac0f-fff1-49ae-ada1-8a933130cad6}PolicyVersion" Size: "0x00000000" Attributes: "0x00000000"  Status: EFI_NOT_FOUND
[SetVariable][VendorGUID: 77FA9ABD-0359-4D32-BD60-28F4E78F784B] Variable: "{0283ac0f-fff1-49ae-ada1-8a933130cad6}PolicyUpdateSigners" Size: "0x00000000" Attributes: "0x00000000"  Status: EFI_NOT_FOUND
For both SAC policies any EFI variable will be cleared. Afterwards, the policy will be set as active by calling SIPolicySetActivePolicy. This call will add the policy into a Node that will be linked into the global variable g_SiPolicyCtx. The g_NumberOfSiPolicies will be incremented accordingly and a handle to the new policy will be stored in the g_SiPolicyHandles – This variable is an array of 32 handles, since WDAC supports up to 32 active policies on a device at once.
The prototype for the SI_POLICY_CTX structure which is kept in the g_SiPolicyCtx is the following:
typedef struct _SI_POLICY_CTX {
  PSI_POLICY Policy;
  PSI_POLICY BasePolicy;
  GUID PolicyGUID;
  GUID BasePolicyGUID;
  bool IsBasePolicy;
  bool AuditModeEnabled;
  PSI_POLICY_CTX RootNode;
  PSI_POLICY_CTX NextNode;
  PSI_POLICY_CTX SupplementalPolicy;
} SI_POLICY_CTX, *PSI_POLICY_CTX;
And the following image shows the three global variables. In my case there are three active policies one of them being a supplemental policy for the SAC enforce policy – Supplemental policies help expand the Base policy to increase the circle of trust of the policy.

With this information, the loader will be able to build the CI structure inside the loader parameter block. This is done inside the function OslBuildCodeIntegrityLoaderBlock. This routine, among many other things, will obtain the size of the serialized SI policies with the help of the function SIPolicyGetSerializedPoliciesSize. The code will use the global variables g_NumberOfSiPolicies and the g_SiPolicyHandles and the size will be stored in the field CodeIntegrityPolicySize of the LOADER_PARAMETER_CI_EXTENSION. Afterwards, the serialized data will be copied by means of the function SIPolicyGetSerializedPolicies. The offset to this data will be stored in the field CodeIntegrityPolicyOffset. This information, along other CI info, will be stored in the fields CodeIntegrityDataSize and CodeIntegrityData of the LOADER_PARAMETER_EXTENSION – The Loader Parameter Block is passed as an argument when the loader transitions into the OS.
Yep, only the serialized payload will be copied. I guess all the parsing of the policy done previously is mainly to check the policy is valid and trigger
SYSTEM_INTEGRITY_POLICYerror if not valid. Potentially also to use values from the policies for Attestation or EFI variables.
And that’s pretty much all we are gonna see for the SAC initialization during the winload – In a future post we might re-visit the winload to talk about SiPolicies and MeasuredBoot, PCRs, etc…
The following capture shows how this data will be set up before the transition to the OS.

SAC during OS Init
In this section we will take a quick glance on how the kernel initialize the CI. After this, we will get into how the CI initialize the Policies provided by Winload. And lastly, how from these policies it determines if SAC is enabled to act accordingly.

During the OS initialization, more specifically during the Phase 1. The kernel will call the method CiInitialize (Exported by the ci.dll). This function will mainly be used by the kernel and CI to exchange APIs. The kernel receives the SeCiCallbacks, which contains the functions pointers the kernel will use to interact with the CI. On the other hand the CI DLL receives the SeCiPrivateApis, which contains, among other kernel functions, the VSL HVCI interface so the CI can trigger Hypercalls by means of the kernel when doing any HVCI validation. The kernel will also pass the the initial CodeIntegrity options. These options were built by the Windows Loader and stored in the LOADER_PARAMETER_CI_EXTENSION. These options initially will contain things like the CodeIntegrity BCD options (DisableIntegrityChecks, AllowPrereleaseSignatures, AllowFlightSignatures) and the WHQL Settings. The CI Options are stored in the global variable g_CiOptions, and CI will also update them based on information retrieved from the OS and the policies.
Disclaimer: The CI is a whole beast on it’s own and the purpose of this post is to understand how SAC works not how the whole CI works. I’ll be focusing mainly on SAC and what is necessary for it to work. We will still learn a lot about the CI but I will leave many things aside. At some point I might do a full post on the CI 😀.
Still during the Phase 1 of the OS, the kernel will call CiInitializePolicy throughout the CI callbacks. This routine will receive as the first parameter the LOADER_PARAMETER_CI_EXTENSION. The routine will call into it’s private counterpart CipInitializeSiPolicy. The function will call SIPolicyInitializeFromSerializedPolicies to validate, parse and load into memory the serialized policy from the loader parameter CI extension. Same as with winload, if the policy parsing works correctly the policy will be added to the g_SiPolicyHandles & g_SiPolicyCtx. More important, if the serialized policies are parsed correctly then function CipUpdateCiSettingsFromPolicies will be called. This method updates the global CI settings based on the PolicyRules from each policy. Within this function the CI will check if SAC is enabled by calling SIPolicyNightsWatchEnabled.
1: kd> k
 # Child-SP          RetAddr               Call Site
00 ffff998b`4b406748 fffff800`356858b4     CI!SIPolicyNightsWatchEnabled
01 ffff998b`4b406750 fffff800`35683ba0     CI!CipUpdateCiSettingsFromPolicies+0x224
02 ffff998b`4b406800 fffff800`35622f94     CI!CipInitializeSiPolicy+0x24
03 ffff998b`4b406830 fffff800`356626fc     CI!CiInitializePolicyFromPolicies+0x278
04 ffff998b`4b4068a0 fffff800`32b5766c     CI!CiInitializePolicy+0x28c
05 ffff998b`4b4069d0 fffff800`32b2a59b     nt!SeCodeIntegrityInitializePolicy+0x70
06 ffff998b`4b406a00 fffff800`32825d43     nt!Phase1InitializationDiscard+0xb0f
07 ffff998b`4b406bb0 fffff800`322c3977     nt!Phase1Initialization+0x23
08 ffff998b`4b406bf0 fffff800`32423bb4     nt!PspSystemThreadStartup+0x57
09 ffff998b`4b406c40 00000000`00000000     nt!KiStartSystemThread+0x34
This function is interesting and we can finally start to take a look into the SI policy structure. What the function will do is call SIPolicyQueryOneSecurityPolicy. This routine has the following prototype:
NTSTATUS
SIPolicyQueryOneSecurityPolicy(
  PSI_POLICY SiPolicy,
  PCUNICODE_STRING Provider,
  PCUNICODE_STRING Key,
  PCUNICODE_STRING ValueName,
  PDWORD Type,
  PVOID Data,
  PULONG RetLen
  );
This method will be quite recurrent when dealing with SI policies. Since is used to check/obtain the SecureSettings set in a policy. The policy structure (I personally named this structure SI_POLICY) has the following two members: SecureSettingsCount & SecureSettingsData.
typedef struct _SECURE_SETTINGS_DATA {
  INT32 Type;
  UNICODE_STRING Provider;
  UNICODE_STRING Key;
  UNICODE_STRING ValueName;
  union {
    bool Boolean;               // Type 0
    INT32 Int;                  // Type 1
    POLICY_BINARY_DATA Binary;  // Type 2
    UNICODE_STRING String;      // Type 3
  } Data;
} SECURE_SETTINGS_DATA, *PSECURE_SETTINGS_DATA;

typedef struct _SI_POLICY {
  ...
  INT32 SecureSettingsCount;                  // offset 0x698

  _Field_size_(SecureSettingsCount * sizeof(SECURE_SETTINGS_DATA))
  PSECURE_SETTINGS_DATA SecureSettingsData[];   // offset 0x6A0
  ...
} SI_POLICY, *PSI_POLICY;
When the serialized policy is parsed, the necessary memory for all secure settings will be allocated and stored in the SecureSettingsData pointer. Whenever the CI has to query a security setting, it will call SIPolicyQueryOneSecurityPolicy with the Provider, Key & ValueName that it needs to look for. Internally the function will store those three values in a structure that will be used as the Key in the bsearch function. The base for the search will be set to the SecureSettingsData of the policy. The CompareFunction is set to SIPolicySecureSettingSearchCompare. The CompareFunction will try to match the Provider, Key and ValueName from the SECURE_SETTINGS_DATA with the ones that are being queried. The comparison for each value is done using RtlCompareUnicodeString.
In our case, when looking to see if SAC is enabled – Inside SIPolicyNightsWatchEnabled – the values passed to the query function will be the following:
- Provider: Microsoft
- Key: WindowsLockdownPolicySettings
- ValueName: VerifiedAndReputableTrustMode
In case the secure setting is found in the policy, then SAC is considered to be enabled and the value NW_ENABLED (0x4000) will be set in the g_CiPolicyState.
These values are also present in the XML format of the Policy. If you check the Enforce and Evaluation XML from the appendix, you’ll see this Secure Setting is set to true in both.
Just for completion, the PolicyState is a bitfield that can take the following values (Some are missing) – These are mostly taken from the ETW event metadata from function CiInstrumentSiPolicyInfo
typedef enum _CI_POLICY_STATE {
  NEED_TO_APPLY_TO_CI = 0x1,
  NEED_TO_APPLY_TO_UMCI = 0x2,
  AUDIT_MODE_ENABLED = 0x4,
  REQUIRES_WHQL = 0x8,
  REQUIRES_EV_WHQL = 0x10,
  INVALIDATE_EA_ON_REBOOT = 0x20,
  PER_PROCESS_VALIDATION = 0x40,
  FORCE_IMAGE_REVALIDATION = 0x80,
  FULL_IMAGE_PATH_AND_MACROS = 0x400,
  UMCI_AUDIT_ONLY = 0x800,
  UMCI_OPT_FOR_EXPIRED = 0x1000,
  AUTH_ROOT_AUTHORIZED = 0x2000,
  NIGHTS_WATCH = 0x4000,
  SMART_LOCKER = 0x8000,
  REQUEST_AUTH_ATTRS = 0x10000,
  APPID_TAGGING = 0x20000,
} CI_POLICY_STATE, *PCI_POLICY_STATE;
The following shot shows the state right before calling SIPolicyQueryOneSecurityPolicy within SIPolicyNightsWatchEnabled with the SAC enforce policy being used for the query – Sorry about the light theme, the dx grid doesn’t look very well with the dark theme.

Going back into CiInitializePolicy, a global variable to indicate the minimum value seen for SAC in this boot-session will be update in the following fashion:

Basically, in case SAC is enabled, then the local variable EnforceNW will be set with the PolicyGUID of the SAC enforce policy. This GUID is then passed into the function SIPolicyIsPolicyActive. If this function returns true (1) then the code will subtract “2-1” setting the g_NightsWatchDesktopMinValueSeenDuringThisBootSession to Enforce state. In case the SAC Enforce policy is not active but SAC is enabled. The function returns false(0) then the value stored in the global will be “2-0” setting the Evaluation state. Lastly if SAC is not enabled then the value stored in the global is 0 (Off state).
In Part 2 we will see how CI handles SAC state transitions that are triggered when changing the State in the Windows Security App. Little Spoiler: This involves handling a signal sent by the Defender, and that’s something we will discuss in that post 🙂.
CI Protected SubKey
In this last section we will see how values under the RegKey CI\Protected are secured by the OS. This is critical for the feature because being able to control VerifiedAndReputablePolicyStateMinValueSeen would allow us to change the SAC state across reboots.
During CiInitializePolicy the first function that will be called is CipCheckLicensing. This routine will be the first to open the SubKey \\CurrentControlSet\\Control\\CI\\Protected – This time is opened to check the Licensed value but that’s not relevant.
Once the CI obtains a handle to the Protected SubKey, it will use one of the methods provided by the kernel during initialization in the SeCiPrivateApis table. Particularly the method SepZwLockRegistryKey. This method will reach NtLockRegistryKey (Throughout the Zw version). NtLockRegistryKey will use the Handle of the key to obtain a reference to the Object, key objects are represented with the CM_KEY_BODY structure. The key object will be passed to CmLockKeyForWrite, which will obtain the CM_KEY_CONTROL_BLOCK and call CmpGlobalLockKeyForWrite. See the following stack:
1: kd> k
 # Child-SP          RetAddr               Call Site
00 fffff882`b2a06500 fffff805`3f7a6189     nt!CmpGlobalLockKeyForWrite+0xbe
01 fffff882`b2a06540 fffff805`3f7a6020     nt!CmLockKeyForWrite+0x11d
02 fffff882`b2a06590 fffff805`3f432465     nt!NtLockRegistryKey+0x70
03 fffff882`b2a065e0 fffff805`3f424380     nt!KiSystemServiceCopyEnd+0x25
04 fffff882`b2a06778 fffff805`3f86cab9     nt!KiServiceLinkage
05 fffff882`b2a06780 fffff805`43ff4e87     nt!SepZwLockRegistryKey+0x9
06 fffff882`b2a067b0 fffff805`43ff24bf     CI!CipCheckLicensing+0x1fb
07 fffff882`b2a068a0 fffff805`3fb5766c     CI!CiInitializePolicy+0x4f
08 fffff882`b2a069d0 fffff805`3fb2a59b     nt!SeCodeIntegrityInitializePolicy+0x70
09 fffff882`b2a06a00 fffff805`3f825d43     nt!Phase1InitializationDiscard+0xb0f
0a fffff882`b2a06bb0 fffff805`3f2c3977     nt!Phase1Initialization+0x23
0b fffff882`b2a06bf0 fffff805`3f423bb4     nt!PspSystemThreadStartup+0x57
0c fffff882`b2a06c40 00000000`00000000     nt!KiStartSystemThread+0x34
Inside CmpGlobalLockKeyForWrite the ExtFlag CM_KCB_READ_ONLY_KEY (0x80) will be set in the KCB for this Key object. This is interesting because the protection is at the Object Manager level. Looking at NtSetValueKey we can see how the KCB ExtFlags are checked to see if the object is ReadOnly in order to deny or not the operation. This will apply no mather the user privileges nor the previous mode. See the following image to see this in action when trying to manipulate VerifiedAndReputablePolicyStateMinValueSeen – Note: The CM callback RegNtSetValueKey will be called, the RegNtPostSetValueKey won’t.

Of course, winload is able to modify this value since the kernel is not running at this point. If we search within System32 for binaries that reference the string VerifiedAndReputablePolicyStateMinValueSeen we will only find:
- winload.exe
- windload.efi
- tcbloader.dll
Personally I think this is a simple solution to protect the key. This was already in place to protect the Licensed value so probably no code had to be added for it. But I wonder why MS didn’t choose to store this value in some space like the TPM NV Storage. Not like this would solve everything. But I feel like the RegKey is easier to manipulate – For instance, using WinRE to open the registry editor, to then load the OS SYSTEM hive would be a plausible way to modify the value VerifiedAndReputablePolicyStateMinValueSeen . For sure, if someone is able to load WinRE and change this you have bigger problems 🤣.
I might be missing something and winload might be storing the value somewhere else, but with the steps I just mentioned using WinRE I’ve been able to successfully go from SAC disable to SAC enabled on my VM.
And with this we’ve reached the end of this post. This is pretty much everything we need to know on how SAC gets initialized. In the next post we can already start looking into how SAC works. I hope you guys enjoyed it and learned something from the post. As always, if there’s any mistake or something not clear, please don’t hesitate to reach out to me on twitter @n4r1b. See you in the next post!!
Appendix
Just sharing this for completion. All credit here goes to Matt Graeber and the amazing WDACTools
Nights Watch SAC Smart App Control Windows Defender Microsoft Security CI AppLocker SmartLocker
Nights Watch SAC Smart App Control Windows Defender Microsoft Security CI AppLocker SmartLocker
4252 Words
2022-08-29 00:00 +0000 (Last updated: 2023-03-29 21:23 +0000)
bbee2f6 @ 2023-03-29