How does the OS Loader loads the essential Drivers
Welcome back! This time we are going to see something previous to the Kernel (Yes! There is something before the Kernel 😅), specifically we are going to check how the OS Loader loads some essential Drivers into memory. To the research I’m going to focus on the Early Launch Anti-Malware (ELAM) Driver. The main motivation to focus on this Driver is that on a near future I would like to write a post on going on depth on how the ELAM Driver works and how it helps protect the system from possible Rootkits.
OS Loader
First the Boot Manager will write the OS Loader into memory and give control to it, which will be in charge of loading the Windows Kernel once it finishes this process the loading phases will be done and the control will be given to the Kernel, and from this point onward we can say we are actually on Windows.
To be able to debug the OS Loader we need to activate the /bootdebug option of the Windows Bootloader entry inside the Boot Configuration Data (BCD), to do this Windows provides a program call bcdedit.exe which will allow us to change the Boot Configuration. After we done this if we reboot the system with a remote debugging session attached to it we will break inside the OS Loader, more specifically inside the function BlBdStart which is the function in charge of checking the connection to the remote machine and loading the symbols to be able to debug DbgLoadImageSymbols. This function comes from BlBdInitalize which as the name implies is in charge of initializing everything necessary to debug (I guess the BlBd prefix meand Bootloader BootDebug). An going up on the call stack again we end up on InitializeLibrary which is the function that does everything necessary for the Bootloader to be able to execute, here we find functions like:
PltInitializePciConfigurationSpaceBootInitializeBlNetInitializeBlpIoInitialize
Names are pretry self explanatory so I will not get into more details (but feel free to check them!). Going forward with the execution we will get into the main code of the Bootloader (OslMain) and his private version OslpMain (Actually where all the “magic” will happen)
This function has to perform two tasks, the first one loads the OS (OslPrepareTarget) and the second perform the transition to the loaded OS (OslExecuteTransition). In this post I will only talks about the first function roughly, as you can imagine it has a lot of code 🤣. The Kernel loading process may vary depending on the options that are activated in the BCD and to determine if an option is active the function BcdUtilGetBootOption will be used, this function is used quite a lot so we will see a bit on how it works:
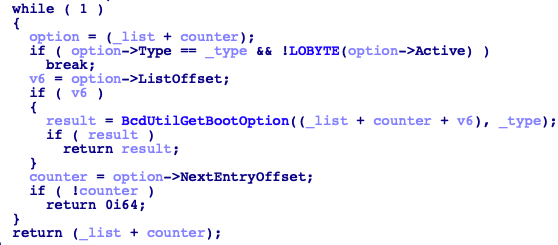
As you can see, it will walk a structure and compare if the type that is being looked (Let’s understand type as option) is among the options of the boot configuration. The structure is the following (All credit to ReactOS)
struct _BL_BCD_OPTION
{
  ULONG Type;
  ULONG DataOffset;
  ULONG DataSize;
  ULONG ListOffset;
  ULONG NextEntryOffset;
  ULONG Active;
};
If we want to the get the name of one of the constants we can try an search on the Microsoft documentation and if it’s not there probably Geoff Chappell has it on his incredible documentation)
OslpLoadAllModules
Allow me to fast-forward directly to one of the main functions in the Bootloader OslpLoadAllModules, believe me, this function does a lot I’ll try to resume it to get into the point that concern us.
First it gets the boot flags (OslpGetBootDriverFlags), with this it will check a couple of things. First if the 5-level paging is active, if is the case the Bootloader will load the followinf kernel ntkrla57.exe. Then it will check the flags BCDE_OSLOADER_TYPE_KERNEL_PATH and BCDE_OSLOADER_TYPE_HAL_PATH, if they are set it will load the values from the flag (This value is a string). Finally, it will check the arch of the machine to see if it has to load any microcode update for the arch.
This drivers have the name mcupdate_[OsArch] basically they contain microcode updates specif for the CPU. If you check on your PC and you see that the modification date of the one corresponding to your arch is different to the other. Then probably a KB updated the Driver that matches your arch (Ex. https://support.microsoft.com/en-us/help/4465065/kb4465065-intel-microcode-updates)
Next the function will allocate space for Kernel and the Hal, and both are loaded by calling OslLoadImage. Then the api schema is loaded, for this the .apiset section is obtained from the DLL apisetschema.dll, and with this section the schema is created (ApiSetCreateSchema) and written (ApiSetComposeSchema). At this point if the KD is active the DLLs necessary will be loaded and the LastGoodSettingFlag is checked if the jump is not taken the Bootloeader proceed to load the mcupdate.dll. One last step before loading the Drivers is to load the OS extensions, to do this the Bootloader search the signature CSRT in the ACPI table
This signature corresponds with the table Core System Resources Table, and if the system has any Core System Resource (DMA Controllers, Interrup Controller, etc…) which is non-standard then it must be indicated on this table and therefore the table Root System Description Table (RSDT) must have a pointer to this System Description Tables (SDT). More info on this table here
Lastly, ntoskrnl.exe and hal.dll import functions from other Drivers, and these need to be loaded. In the end, this is how the member LoadOrderListHead of the LOADER_PARAMETER_BLOCK looked (At the point I was investigating this I was running Windows 10 version 1809)
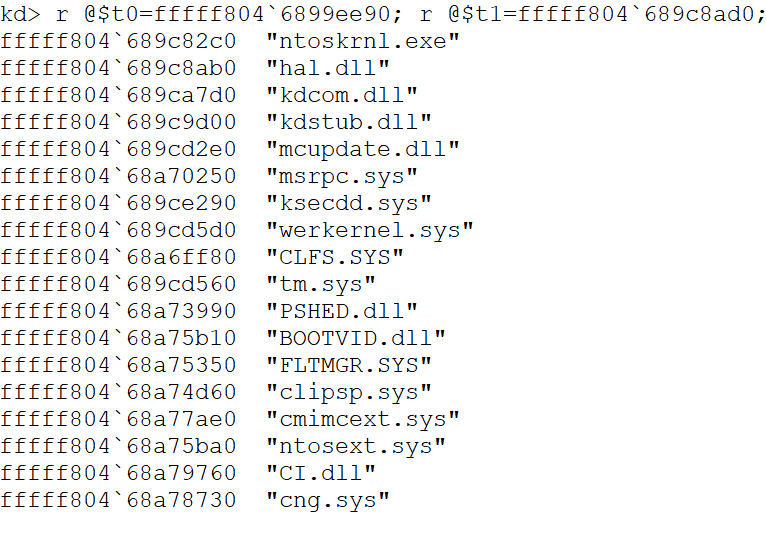
When debuging this neither
OslLoadImagenorOslLoadDriversload the symbols (They don’t callDbgLoadImageSymbols) so we won’t have their symbols in the debugger, and to be honest nt symbols are quite handy 🤣. WinDbg give us the option to load the symbols if we know the ImageBase which we can get from theLOADER_PARAMETER_BLOCK. The command is.reload /f /i [ModuleName]=[ModuleImageBase]
Loading the Drivers
Finally! How the essential Drivers are loaded. We are still on the function OslpLoadAllModules (As I mentioned in the beginning, I will focus on the ELAM Driver but the process can be extrapolated to other Drivers if there’s anything exclusive from the ELAM I will mention it)
The first function necessary to load the drivers is OslGetBootDrivers, the first thing it will do is get the list of Drivers to load, this list is obtained within the function OslHiveFindDrivers, which mainly calls CmpFindDrivers. This function loads the Data Cell (_CELL_DATA) of the Service key inside the CurrentControlSet, with this cell the code iterate the Service key and the function CmpIsLoadType will check if each entry has the Start key with value equals 0x0, if so, the _BOOT_DRIVER_LIST_ENTRY is initialized by calling CmpAddDriverToList, this function basically reads the data from the entry and fills in the structure. This goes on with all the elements within HKEY_LOCAL_MACHINE\SYSTEM\CurrentControlSet\Services and finally we will have the member BootDriverListHead of the LOADER_PARAMETER_BLOCK with all the essentials drivers to be loaded.
I didn’t manage to find the complete structure of the member BootDriverListHead anywhere (If anyone knows it please contact me!). The most similar structure is the _BOOT_DRIVER_LIST_ENTRY from ReactOS. But I’m not sure if Microsft added more values or maybe I’m mistaken. Based on what I saw, it would be something like this:
struct _BOOT_DRIVER_LIST_ENTRY
{
    LIST_ENTRY Link;
    UNICODE_STRING PathToDriver;
    UNICODE_STRING RegistryPath;
    PLDR_DATA_TABLE_ENTRY DriverLdrTableEntry;
    ULONG DriverLoadNtStatus;
    ULONG Unknown; /* It's obtained in the function ImgpValidateImageHash,
                      probably related with some integitry check, please contact me
                      if you have more info */
    PHHIVE Hive;
    UNICODE_STRING HiveName;
    UNICODE_STRING DriverDependencies;
    UNICODE_STRING DriverGroup;
    UNICODE_STRING DriverRootName;
    ULONG DriverTag;
    ULONG DriverErrorControl;
}
Next, the dependencies for this Drivers will be added to the _BOOT_DRIVER_LIST_ENTRY (Checking the subkey PendingDriverOperations). Finally, the function CmpSortDriverList will sort the Drivers based on the value List from the subkey ServiceGroupOrder within the key Control (This Data Cell was previously loaded).
This is explained (Better than me) by Microsoft in the following artice https://docs.microsoft.com/en-us/windows-hardware/drivers/install/specifying-driver-load-order
The list would end up like this (Command: r @$t0=[Addr BootDriverList]; r @$t1=[Addr BootDriverList.Link]; .while(@$t0 != @$t1) {dS /c 80 @$t1+10; r @$t1=poi(@$t1)} the command !list would make this easier)
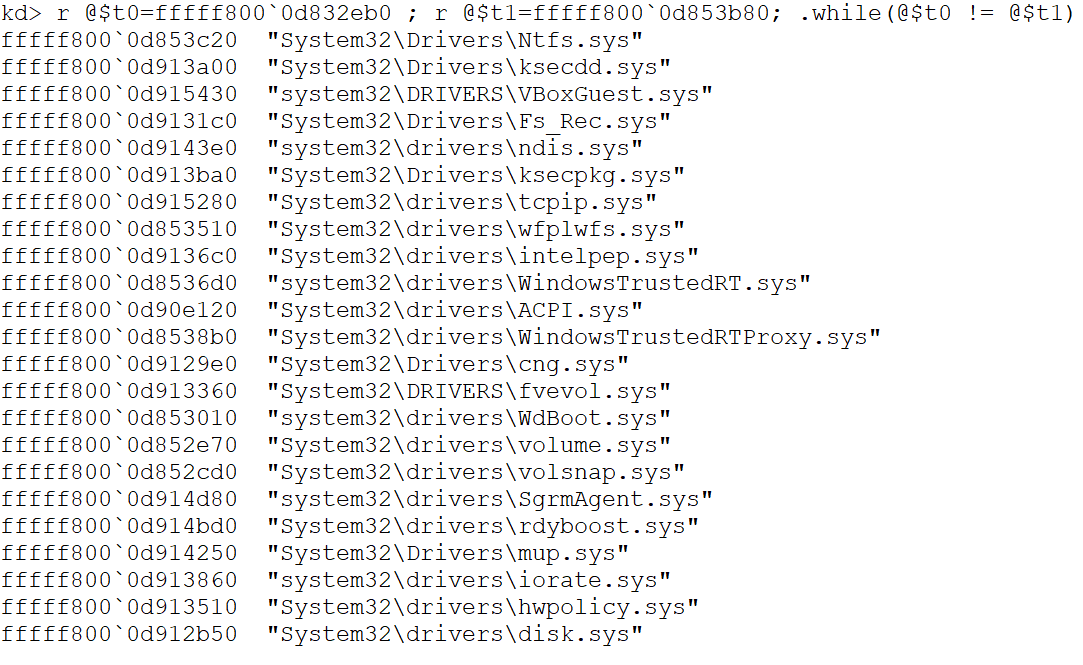
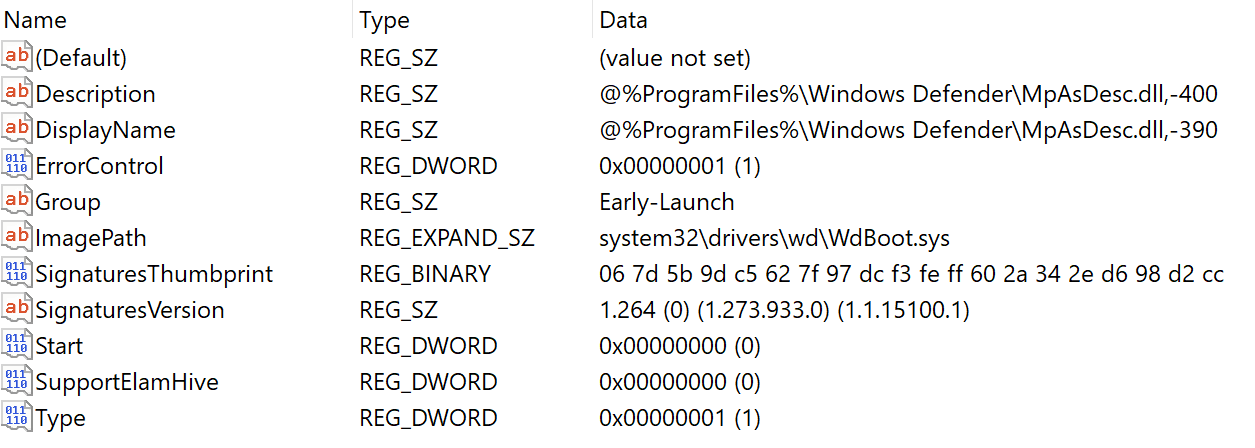
Two filters will be applied to this list, one by Group (OslpFilterDriverListOnGroup), this one will receive the string Early-Launch, which will copy the ELAM Driver from the BootDriverListHead to the EarlyLaunchListHead. In the image it can be seen how the Driver WdBoot.sys (Windows Defender ELAM) belongs to the group Early-Launch.
The second filter is based on the Service (OslpFilterDriverListOnServices), this one is applied multiple times. First time to copy the Core Drivers to the CoreDriverListHead, second time to copy the TmpCoreDrivers and lastly to copy the Extension Drivers. Now Everything is ready to load the Drivers.
To get the Core Drivers the DriverRootName is compared against the following list (Within the .rdata of the binary):
- VERIFIEREXT
- WDF01000
- ACPIEX
- CNG
- MSSECFLT
- SGRMAGENT
- LXSS
- PALCORE
OslLoadDrivers
The first Driver that will be loaded are the Core Drivers, then the TmpCore Drivers, next the ELAM Drivers. Before loading the ELAM Driver the Bootloader checks that the boot flag 0x260000E1(BCDE_OSLOADER_TYPE_DISABLE_ELAM_DRIVERS) is not active, if the option is active it disable the loading of ELAM Drivers. In our case is not active so the function OslLoadDrivers is called, this function generates the full path to the Driver (BlLdrBuildImagePath) and calls OslLoadImage, from here we start going deeper into functions (With the same parameters) until we get to LdrpLoadImage:

This function first check if the Driver is already in the LDR_DATA_TABLE (Basically the function BlLdrFindDataTableEntry iterate the table and check if the name of the Driver is already there). In case the Driver is not found in the table, the Flags of the Driver will be processed with the function OslpLdrExProcesssImageFlags (This function is obtained from some kind of vTable that contains functions that help in the loading process)
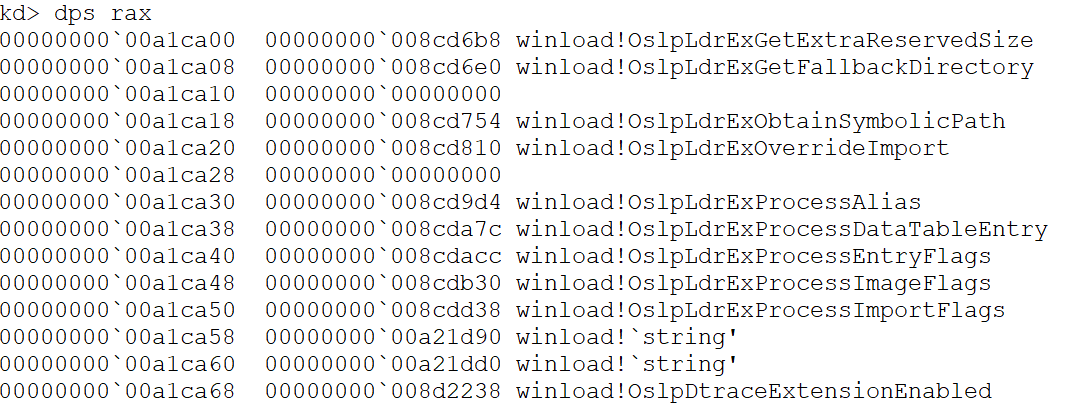
After the Flags had been processed, the Driver will be load into memory using the function BlImgLoadPEImageEx. This function will obtain a “handle” to the file calling ImgpOpenFile
I call this Handle but really is a structure, in ReactOS they call this structure
_BL_IMG_FILE, and betweent other things it contains the FileName and the FileSize
with this handle the function ImgpLoadPEImage will be executed. This will load the PE, the steps are the normal steps to load a PE (NOTE: I will not get into al the Digital Signature and Checksum stuff, is to complex for me, I need to investigate more about it to not mess it up). The atributes of the file are retrieved with a call to BlFileGetInformation, then the NT header will loaded and three things will be checked:
- ntHeaders->FileHeader.Machine == IMAGE_FILE_MACHINE_AMD64
- ntHeaders->OptionalHeader.Subsystem == IMAGE_SUBSYSTEM_WINDOWS_BOOT_APPLICATION
- ntHeaders->OptionalHeader.DllCharacteristics & IMAGE_DLLCHARACTERISTICS_FORCE_INTEGRITY
if those are met, the type of hash for the integrity is obtained (0x8004 -> CALG_SHA_256), then the virtual size of the image is allocated and the sections are copied. When the image is mapped in memory the digest is checked and then the image is relocated LdrRelocateImage and finally the physical address of the image is obtained (Not sure why it does this thou)

To finish, the SymbolicPath and the loaded Driver is added to the LDR_TABLE_ENTRY, at this point doing this is trivial, all the info to do this is accesible, the function in charge of doing this is BlLdrAllocateDataTableEntry and since a picture is worth a thousands words:

the LIST_ENTRY of the new entry will be linked and the imports of the Driver will be loaded LdrpLoadImports and they will be binded through the call to BlLdrBindImportReferences. And that’s pretty much all (Roughly, but I guess if you are reading this you have IDA 😉). Now the code will start returning until OslLoadDrivers where the member DriverLoadNtStatus will be set and the NTSTATUS is returned.
A picture of how the _BOOT_DRIVER_LIST_ENTRY would end up looking after the Windows Defender ELAM is loaded (The member DriverTag is 0xFFFFFFFF because the WdBoot Driver doesn’t have this key on the registry):

Conclusions
That’s all folks, I’ll leave some notes down below to explain some things a bit more in depth. As I mention if I have time I would like to talk about the WD ELAM Driver in the next entry. I hope I’ve raised some curiosity and I encourage you to research more because there’s still a lot that I didn’t mention.
As always, I hope you liked the post. If something is not clear feel free to contact me I’m always willing to discuss stuff related to the Bootloade/Kernel and – It’s free!!. I know I left a lot of things aside, sorry for that, but believe me th Bootloeader has A LOT of code and also a lot of complex things. And lastly, if I made a mistake, please contact me so I can fix it, I’m open to any critics 😊.
Notes
LOADER_PARAMETER_BLOCK
The LOADER_PARAMETER_BLOCK is probably the most important structure in the Bootloeader. This structure will be collecting critical information during the loading of the OS, later all this information will passed to the kernel (A reference to this structure is saved in the variable KeLoaderBlock). Thankfully, since version Windows 10 1803 Redstone 4 (Spring Creators Update) Microsoft released the prototype of this structure in a header file (Before it was in the symbols but not in a header file)
kd> dt nt!_LOADER_PARAMETER_BLOCK
   +0x000 OsMajorVersion   : Uint4B
   +0x004 OsMinorVersion   : Uint4B
   +0x008 Size             : Uint4B
   +0x00c OsLoaderSecurityVersion : Uint4B
   +0x010 LoadOrderListHead : _LIST_ENTRY
   +0x020 MemoryDescriptorListHead : _LIST_ENTRY
   +0x030 BootDriverListHead : _LIST_ENTRY
   +0x040 EarlyLaunchListHead : _LIST_ENTRY
   +0x050 CoreDriverListHead : _LIST_ENTRY
   +0x060 CoreExtensionsDriverListHead : _LIST_ENTRY
   +0x070 TpmCoreDriverListHead : _LIST_ENTRY
   +0x080 KernelStack      : Uint8B
   +0x088 Prcb             : Uint8B
   +0x090 Process          : Uint8B
   +0x098 Thread           : Uint8B
   +0x0a0 KernelStackSize  : Uint4B
   +0x0a4 RegistryLength   : Uint4B
   +0x0a8 RegistryBase     : Ptr64 Void
   +0x0b0 ConfigurationRoot : Ptr64 _CONFIGURATION_COMPONENT_DATA
   +0x0b8 ArcBootDeviceName : Ptr64 Char
   +0x0c0 ArcHalDeviceName : Ptr64 Char
   +0x0c8 NtBootPathName   : Ptr64 Char
   +0x0d0 NtHalPathName    : Ptr64 Char
   +0x0d8 LoadOptions      : Ptr64 Char
   +0x0e0 NlsData          : Ptr64 _NLS_DATA_BLOCK
   +0x0e8 ArcDiskInformation : Ptr64 _ARC_DISK_INFORMATION
   +0x0f0 Extension        : Ptr64 _LOADER_PARAMETER_EXTENSION
   +0x0f8 u                : <unnamed-tag>
   +0x108 FirmwareInformation : _FIRMWARE_INFORMATION_LOADER_BLOCK
   +0x148 OsBootstatPathName : Ptr64 Char
   +0x150 ArcOSDataDeviceName : Ptr64 Char
   +0x158 ArcWindowsSysPartName : Ptr64 Char
This applies to Windows 10 Kernel Version 17763.1.amd64fre.rs5_release.180914-1434 and here you can find it as a C struct.
SystemHive
The function in charge of loading the System Hive is OslpLoadSystemHive, it receives the parameters:
- A DeviceID which represents an index in the table
DmDeviceTable, table that contains the open devices (Notes DeviceId) - A
UNICODE_STRINGwith the path of the system root (Obtained with the functionOslpInitializeSystemRoot) - A pointer to the
LOADER_PARAMETER_BLOCK
This function will generate three strings with the function swprintf_s. First one, the FullPath of the Hive. Second and third strings correspond to the path of the log of changes in the Hive. Next, the function will call OslLoadAndInitializeHive with the following params:
__int64 OslLoadAndInitializeHive(
  IN      ULONG DeviceID,
  IN      WCHAR *FullHivePath,
  IN      BOOLEAN FlagControlSet,
  IN      WCHAR *Log1Path,
  IN      WHCAR *Log2Path,
  OUT     PVOID RegistryBase,
  OUT     ULONG *RegistryLength,
  IN      PLOADER_HIVE_RECOVERY_INFO HiveRecoveryInfo,
  OUT     PVOID HiveId
);
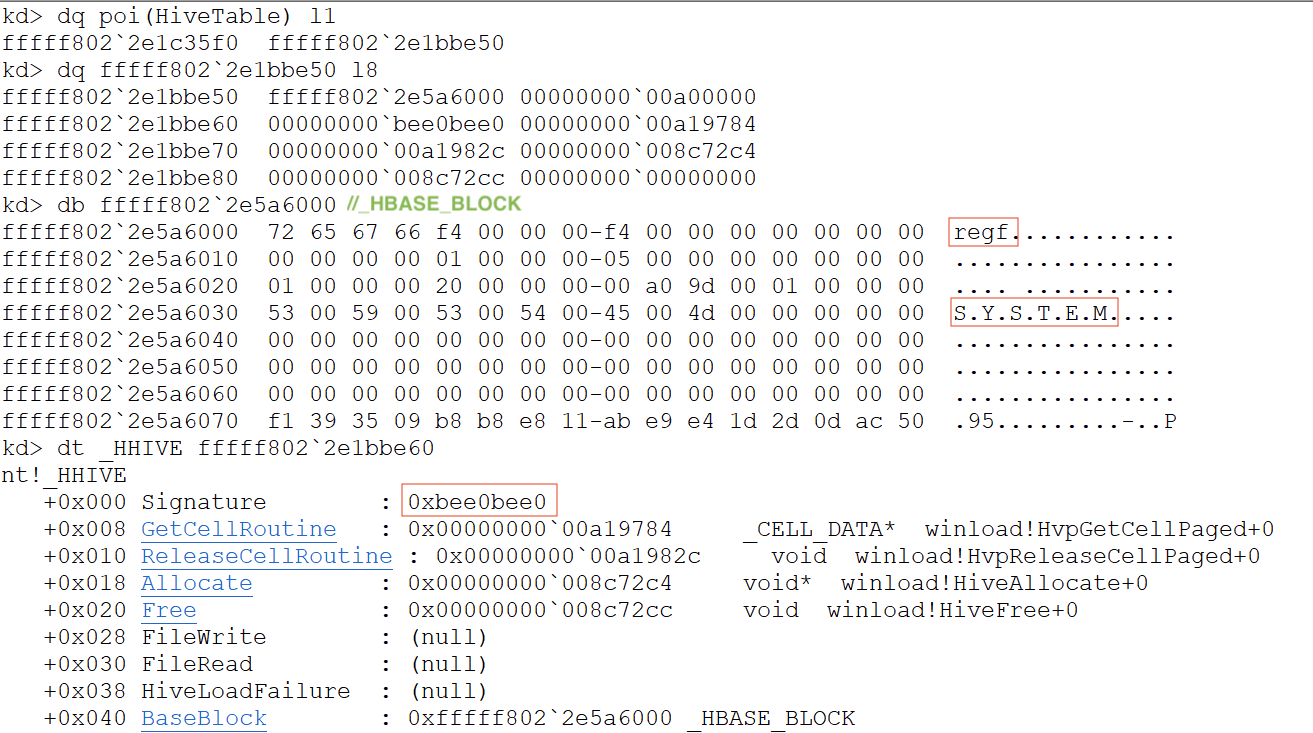
First thing is to open the file (BlImgLoadImageWithProgress2) and save a pointer to it on the variable RegistryBase. Afther this the File Header will be filled and finally the call to HiveInitializeAndValidate will initialize the Hive. This function initialize and validates the structure HHIVE
  Hive = 0xBEE0BEE0; // Set the signature to the Structure
  Hive->GetCellRoutine = HvpGetCellPaged; // Function to get a CellPage
  Hive->ReleaseCellRoutine = HvpReleaseCellPaged; // Function to release a CellPage
Next, the function HiveAddTableEntry add this Hive to the HiveTable. Since this is the first time this function is called the table will be initialized (Constant to 4 entries), the address of the Hive is copied to the table (BlTblSetEntry) and the HiveId is set with the index of this Hive in the table.
Finally, if the FlagControlSet is active, the function OslSetControlSet will be called to check if the value Default of the key Select inside the Hive matches any ControlSet (The famous ControlSet001) and then it will change the key Current with this number. In memory it will look something like this:
OslAttachHiveToLoaderBlock
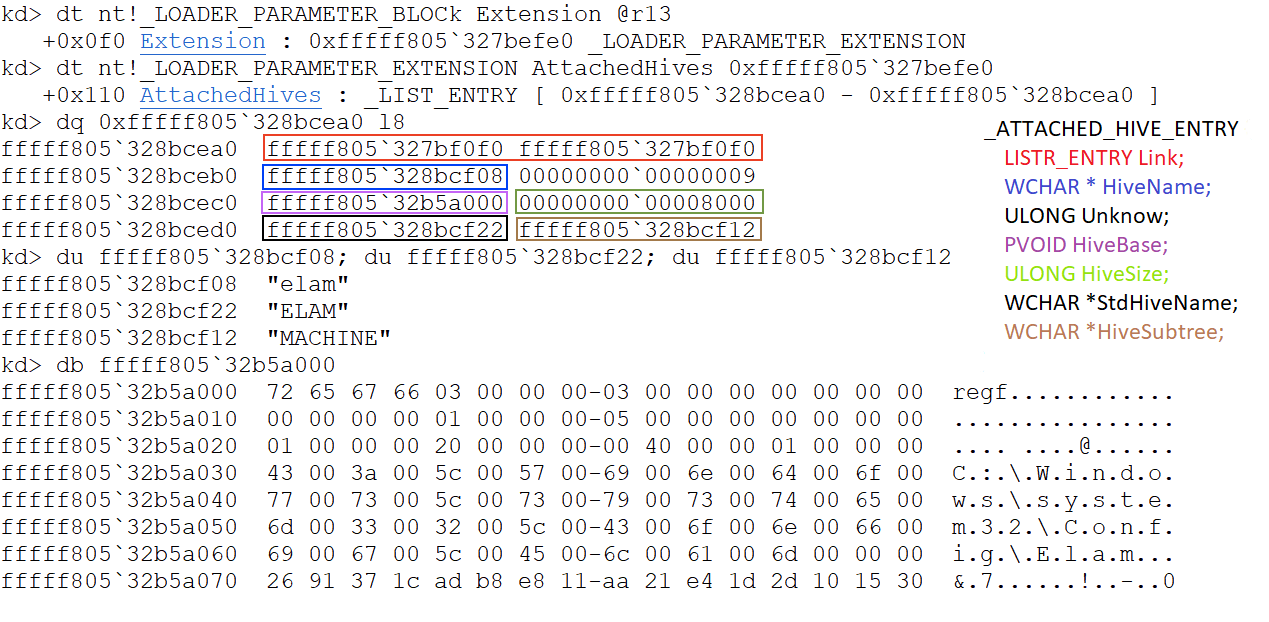
This function is quite generic, but I mention it here because after loading the ELAM Driver this function will be called in order to add the ELAM Hive to the Loader Block (I still haven’t check how ELAM Drivers work but I guess they need this Hive to work correctly). First, this function will obtain the path to the HIVE (The ELAM Hive in this case)

Next, the Hive will be loaded by calling HiveLoadHiveFromLocation, which in the end will call OslLoadAndInitializeHive as seen in the notes on the SystemHive. With the loaded Hive a structure I couldn’t find anywhere will start to be filled, this structure has the following format (If it sounds familiar or you know more about it please let me know):
struct _ATTACHED_HIVE_ENTRY
{
  LISTR_ENTRY Link;
  WCHAR * HiveName;
  ULONG Unknow; /* I feel like is some kind of ID, but not sure */
  PVOID HiveBase;
  ULONG HiveSize;
  WCHAR *StandardHiveName;
  WCHAR *HiveSubtree;
}
Finally, the structure is linked to the to the member LoaderParamBlock->Extension->AttachedHives through the LIST_ENTRY.
DeviceId
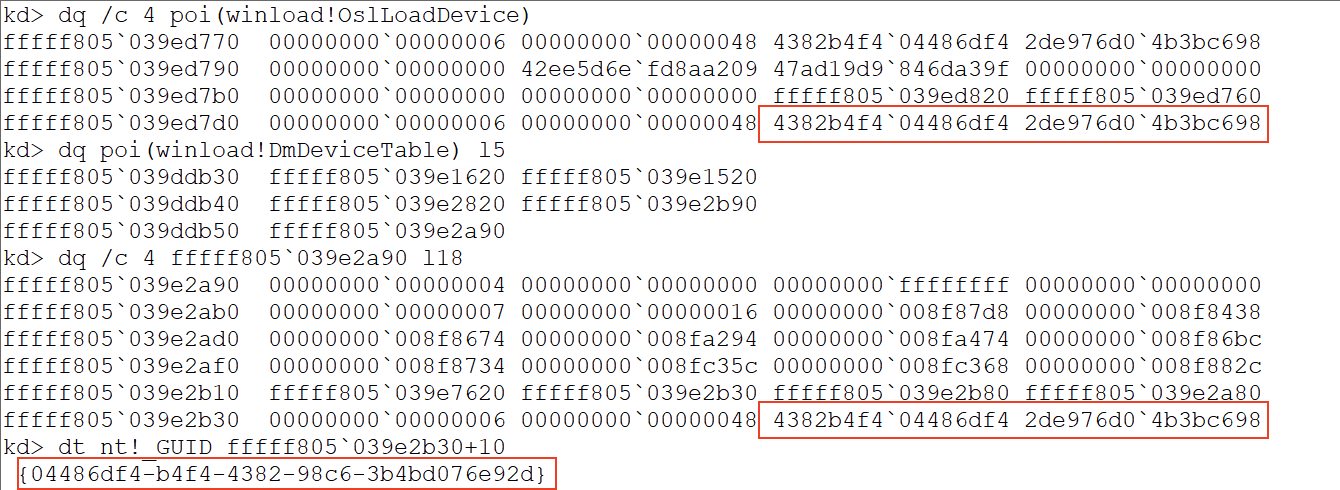
The DeviceId is obtained using the function OslpOpenDevices, this function first look to see if the device is already open (BlpDeviceOpen) to do this it will call BlTblFindEntry with first parameter as the table of open devices DmDeviceTable, second as the number of entries in this table DmTableEntries and fourth is a pointer to the function DeviceTableCompare (This is the function that checks if the device we are looking for is inside the DmTableEntries)
The function OslpOpenDevices will open the device pointed by the variable OslLoadDevice (Also if the boot options BCDE_OSLOADER_TYPE_BSP_DEVICE and BCDE_OSLOADER_TYPE_OS_DATA_DEVICE are set those devices will be open respectively). I will only review the first case, variable OslLoadDevice was previously assigned from the boot flag 0x21000001 (BCDE_OSLOADER_TYPE_OS_DEVICE). This device is no other than the Volume where the Bootloader reside. In my case the Bootloader (winload.efi) is in the Volume C:, the following image shows the device accessing to it from the OslLoadDevice variable and accessing to it through the DmDeviceTable (In this case I know is the index 4)
In ReactOS the structure pointed by the variable
OslLoadDeviceis called_BL_DEVICE_DESCRIPTOR. I couldn’t find any other references to this structure nor a similar structure.
In the following image we can see how the GUID we obtained previoulsy from the device matches the Volume C:, and also matches the Volume where the Bootloader is stored

Lastly, and I’m not totally sure about this (That’s why I left it to the end 🤣). Before I mentioned that the device is the index 4 in the array. If we check with the tool WinObj the HardDisk0, we can see that the partition 4 points to HardDiskVolume4. On the other hand, the object BootPartition and the object BootDevice point to the same Volume. By this, I guess that when the Bootloader initialize the devices it fills the DmDeviceTable in the order in which the partitions are arranged.
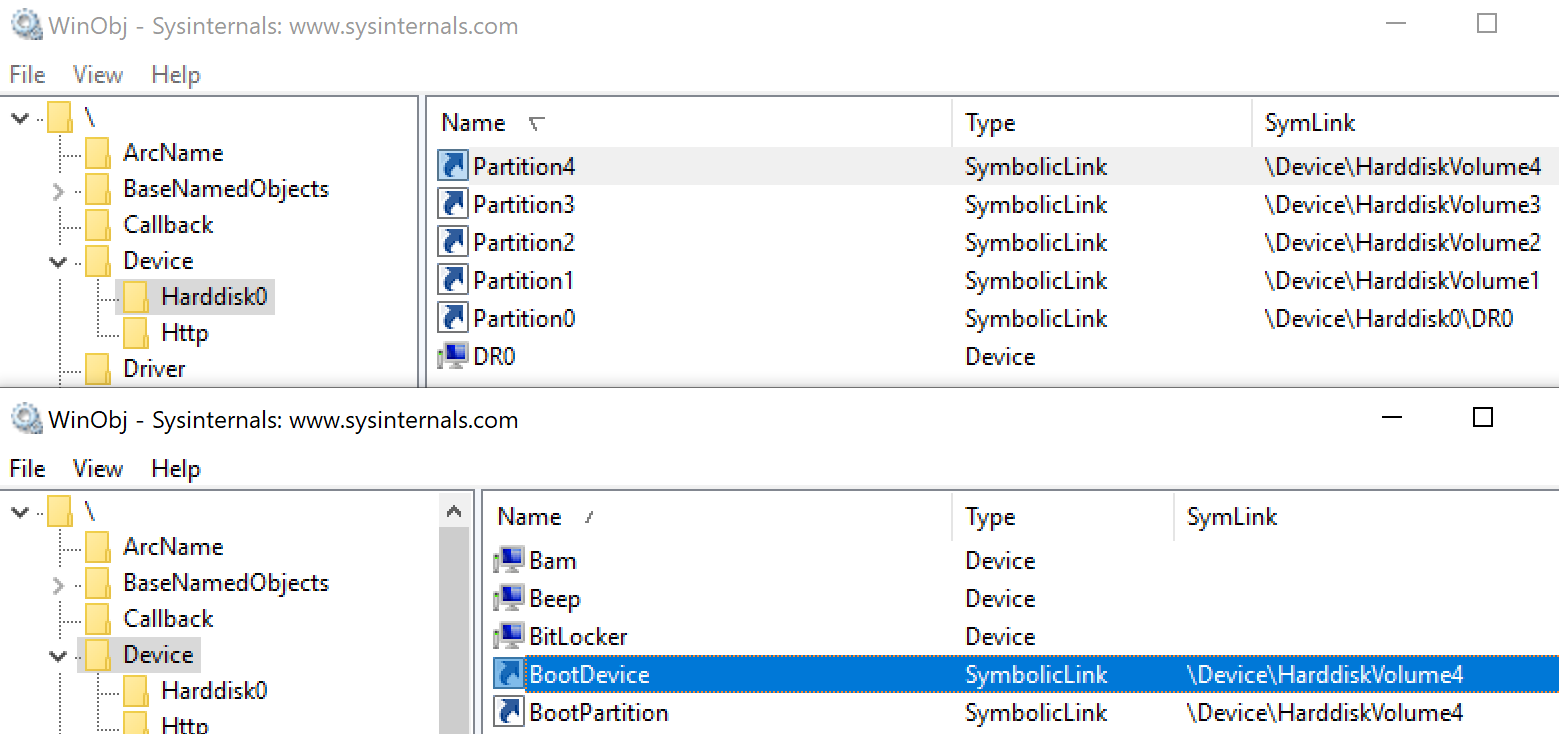
If I’m not wrong the devices are initalized by the function
SpaceBootInitializewith the call toSB_CONTROL::BuildDevices, so this would be a good point to confirm this last paragraph (I could be totally wrong assuming devices are initialized, haven’t reversed this I just suspect it from the name)